How do you find the right photo backpack? What should you look for when buying? Why is a photo backpack with daypack useful for hiking? Which is the best photo backpack? Here comes the ultimate camera backpack guide!
Contents
Since I’ve also used quite a few photo backpacks, I’ll give my personal recommendations right at the beginning.
My personal recommendations for buying a photo backpack
Below are recommendations from me on various photo backpacks. I have arranged these recommendations by size of photo gear.
It may seem strange to you that all the recommendations are from Lowepro. I am not sponsored by this brand. I just think the products are good. After many different photo bags and backpacks, I like Lowepro backpacks the best. Nevertheless, there are also manufacturers like Evoc, mantona, Crumpler, Thule, f-stop or Cullmann that have special backpacks for cameras in their range.
For all recommendations applies: You can also accommodate two more lenses. However, in my experience, as mentioned above, it doesn’t make that much sense to take that many lenses with you. Accessories, food, drink and another thin jacket are more important. I usually only have one, sometimes two lenses with me on my tours. This way I also don’t have to choose between these lenses, but can concentrate on the photography itself. A little less weight and more comfort let me have fun with photography for a longer time.
These camera backpacks have another advantage – they don’t look like a photo backpack right away without a tripod. Thieves are not so quickly aware of their own photographic equipment.
I update these recommendations regularly.
Recommendation with daypack for a system camera + 1-2 lenses without tripod: Lowepro Photo Hatchback BP 250 AW II
The Hatchback BP 250 AW II is a small camera bag from Lowepro. It has, in addition to the camera compartment photo insert, a sufficiently large compartment for the non-photo things like food, drink and jacket. The camera compartment is not permanently attached to the backpack and can be removed. So you can use the backpack even if you do not want to take the camera once.
Access to the camera is only possible through the back, which makes things very difficult for thieves in public transport. The backpack offers a separate compartment for a tablet.
There is no tripod mount on this backpack. It is a good everyday backpack that is also recommended for day trips. The camera compartment is not overly large, a DSLR still fits in to some extent. I therefore recommend the Hatchback primarily for a system camera with 1-2 lenses, filters and without a tripod. The wearing comfort is very good according to several independent reports from my circle of friends. You can find a separate review of this backpack here.
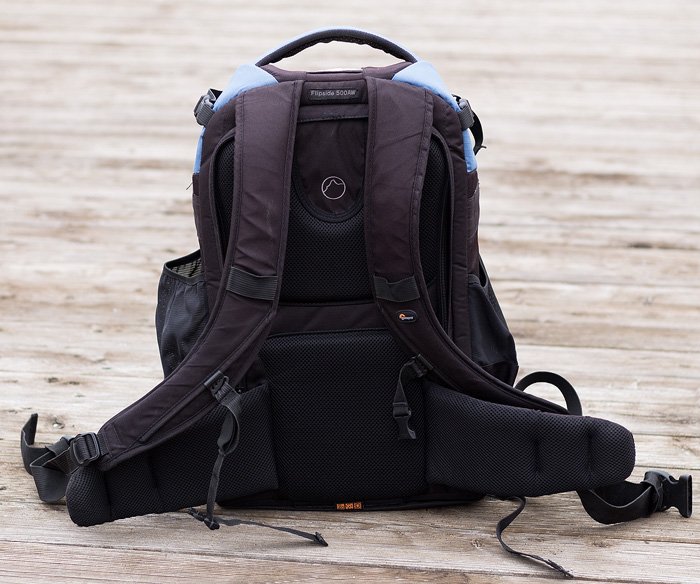
Recommendation for 1-2 DSLRs + 3 lenses with tripod: Lowepro Flipside 500 AW II
I have been using this photo backpack for several years and am very satisfied with it. It is spacious and the dead weight is relatively low. The holder for the tripod is provided at the back, but I always use the side pockets. This makes it more comfortable to carry because the weight is closer to your back. The Lowepro Flipside 500 AW II has room for a digital SLR camera and 3-4 lenses along with accessories. There is also room for food, drinks and a thin jacket. Of course, you can just as well accommodate a system camera with lenses here.
As with many other photo backpacks, the Flipside also offers a variable interior. The compartments can be adapted to your own equipment thanks to Velcro fasteners. For example, I also once transported my tripod at the time (Manfrotto Befree) in the backpack itself for a while, it is so spacious. For smaller photographers, the Flipside 400 AW II is also conceivable.
I use this backpack on virtually all photo tours, whether in the city or in nature. In doing so, I find the carrying comfort very good. As with the Hatchback, it also comes with an AllWeather cover (hence the AW designation), which provides good protection against rain. The main compartment of the photo backpack can only be opened via the back. This again helps against theft in the subway. Nice side effect: if you put the backpack on wet or dirty ground to get your equipment out for photography, you won’t have a dirty back after putting it back on.
Recommendation for 1-2 DSLRs + 3 lenses with tripod: Lowepro Whistler 450 AW II
For large photo equipment that is often transported through nature, I recommend the Whistler 450 AW II from Lowepro. The padding is still a bit better than the Flipside 500 AW II, which is also already good. The Whistler 450 AW II is not only a good choice for photographers with larger gear, but also for videographers. With its many compartments, it offers decent space for accessories as well. It is a bit smaller than the Flipside 500, but the comfort and protection for the equipment is still a bit better.
It has a small daypack and like the Hatchback, the photo compartment can be removed. The materials are designed for rough use and are correspondingly durable. The Whistler is a bit more expensive, but the carrying system and space are worth it. Of course, a tripod can also be attached to the outside of the backpack, alternatively hiking poles, etc..
I recommend this large photo backpack to photographers who travel a lot in nature, go on long tours on foot and want to enjoy a high level of carrying comfort. The Whistler 450 AW II holds 2 SLR cameras and 4 lenses and even then has room for alpine gear. The AllWeather cover is included here as well.
The best photo backpack for me
My personal recommendation for the best photo backpack is based on my experiences over the last 13 years. Currently, the best photo backpack is the Lowepro Flipside 500 AW II. According to Lowepro, it is the world’s most popular camera backpack. The Flipside simply has an exceptionally good price-performance ratio. It is lightweight, holds a lot of equipment and is comfortable to carry. With its good padding, it protects the photo equipment and also has a cover against rain.
What is a photo backpack?
A photo backpack is a special backpack for photo equipment. Its purpose is to allow you to carry your camera and lenses comfortably and protected.
Why I prefer to use a photo backpack instead of a photo bag
If I’m only carrying my camera, one lens, and maybe three filters, it makes sense to use just a small camera bag. I could take my tripod in my hand. In the past, I often used a small bag like the Tamrac System 6.
These bags are also practically divided, well thought out and protect your photo equipment well. The problem is that you always carry the weight of the camera and bag on one side due to the shoulder strap. Sure, it’s possible to switch here from time to time. But in practice, you usually have the bag on the same shoulder. With a photo backpack you distribute the weight on both shoulders. This is much more comfortable in the long run. This way you can enjoy taking pictures for a longer time. That’s why I would always prefer a photo backpack to a photo bag.
What you should look for when buying a photo backpack
The most important point for me: carrying comfort
As you can see, comfort and the health aspect play a big role for me. Therefore, this point is also one of the most important for me: I want to be able to carry my photo equipment comfortably and as fatigue-free as possible over a longer period of time. Everyone has a different body type and therefore you should make sure that the photo backpack fits your body and especially your size. That’s why I advise you to try out the photo backpack beforehand.
Usually, the big electronics stores don’t have too many photo backpacks in stock. It can be more sensible to put on their backpacks on a joint photo tour with some other photographers. This review is much more practical than in the store, because the backpacks already contain cameras and lenses.
The shoulder straps should be well padded and good ventilation on the back is also not wrong. For larger equipment with telephoto lenses, as required by sports and wildlife photographers, chest and waist straps and position adjustment straps are essential.
A good lap belt, for example, allows almost all of the weight to be supported on the pelvis for longer trips, which is much better for the back. A chest strap prevents the shoulder straps from drifting outward, putting strain on the shoulders. With position adjustment straps, the backpack can be adjusted to fit your back perfectly.
Ergonomically, it is advantageous if the photo equipment is as close to your back as possible. The camera backpack should be designed accordingly. I’ll come to more tips for optimal carrying later….
The size – How many bodies and lenses do you take with you?
Before buying, you should be clear about what equipment you want to carry:
- Do you need one camera or two?
- How many lenses do you want to take?
- How big are these lenses?
- What filters will you need on your photo trips?
- What accessories such as batteries, memory cards, remote releases, and cleaning cloths will you take?
- Will you need an external flash?
- Might you add more lenses or cameras in the next two years?
- Will you take a tripod?
- Will you need lens cleaning accessories?
As you think through these items, I recommend using the 80 / 20 rule I explain below in the tips.
Limit yourself to the equipment you really need.
Usually on photo tours I need not only my actual photo equipment, but more than that. I usually carry a thin jacket, food and drink, an e-book reader, headphones, wallet and cell phone. Of course, if I’m staying out, I have to bring the stuff for that as well.
So it’s important to include space in your photo backpack not only for your photography equipment, but also for accessories. For me, the photo equipment takes up about 60% of the space, the other stuff about 40%.
Good quality – these are the features you should look for
Of course, the workmanship of the backpack is also important. Do the zippers run cleanly? Are the seams well made? Your photo equipment should be protected as well as possible. This includes that it is well padded in your photo backpack, because the backpack can also get bumps unintentionally, for example when you put it down or if you bump into a rock face somewhere. With good padding, your equipment will not be damaged in such situations.
An often underestimated point: Handling
On a photo tour I often have to pack and unpack my camera. I might want to reach another lens or have to get the filters out of the photo backpack. I may also have to do this with one hand because I’m holding the camera in the other hand. Depending on how the backpack is constructed, these hand movements are more or less quick or awkward.
I recently received a photo backpack for review that meets many requirements for a good product. I can get all my gear in it, it wears well and even has a laptop compartment. The problem was that the access to the compartment for photo equipment was cut so tight that it was cumbersome to take anything out of there. Therefore, this photo backpack was not for me in the long run.
Before buying, look at how well you can access your packed photo equipment.
- Can the zippers be opened easily?
- Are the openings sized so that you can easily remove your equipment?
- Are there many small pockets so that you can organize your accessories well?
- How quickly can you attach and detach your tripod?
- Can you get your lenses and filters out of the backpack with one hand?
- Can you get to your camera quickly on a long hike without having to open too many zippers and flaps first?
Compartments – adapting the photo backpack optimally to your equipment
Many photo backpacks offer the possibility to adapt the compartments inside to your own needs. Depending on which camera and which lenses you use, you can stow them optimally. For this purpose, there are small fabric walls with Velcro fasteners in the backpack, which you can variably attach to the right place. Meanwhile, almost all manufacturers such as Lowepro, Evoc, Mantona, Crumpler, Vanguard, F-Stop and König offer this option.
A good tripod mount
I use a tripod for 90% of my pictures. Especially for me as a landscape photographer, a tripod mount on the photo backpack is important. Meanwhile, more and more backpacks bring this holder. However, it is often much too small. By much too small, I mean that the holder is then only intended for small tripods. If you then attach a normal-sized tripod such as the Manfrotto 190, this does not sit firmly on the backpack and moves back and forth when carried.
As for the mount itself, again there are ergonomic differences. Not only should the tripod fit tightly, it’s also worth having the tripod as close to your body as possible – on the side of your backpack, for example. This relieves the strain on the back when carrying it. Of course, the backpack must then be packed in such a way that compensating weight is stored on the other side, so that one shoulder or pelvic side is not loaded more.
If the tripod and its center of gravity are far back on the backpack, it will permanently pull you backwards. Your muscles have to work against this direction all the time, which is tiring in the long run.
Last but not least, handling plays a role again: attaching and detaching the tripod should be feasible without much effort.
Rain protection & My experience with a waterproof photo backpack
Newsletter Lead 4 – Photo EquipmentEspecially if you are outdoors a lot with the photo backpack, then a rain protection is important. My experience is that having your own rain cover works better as an overcoat than the manufacturer’s „waterproof“ claim.
This was put to the test on a photo tour in Scotland. Here we hiked for three hours in pouring rain. The backpack at the time was supposed to be waterproof according to the manufacturer, but it didn’t have a pull-over rain cover. The first two hours, the backpack also kept its promise, but from then on the water pushed through.
This is like a rain jacket, which also has a certain water column as a specification, up to which it remains dry. Therefore, my recommendation: Better to pay attention to a coverable rain cover.
All camera backpack recommendations from me below bring such a rain cover.
Frequently asked questions and tips
Can I take my photo backpack on the plane in the hand luggage?
For air travel, it is of course interesting which photo backpack you can take as hand luggage on the plane. This depends a bit on the specifications of the respective airlines, but as a rule of thumb I have the following dimensions for hand luggage in mind:
- Maximum size: 55 cm × 40 cm × 20 cm
- Maximum weight: 8 kg
A nice overview of the different specifications of the respective airlines can be found at Wikipedia. On my air travels so far it has never happened to me that I was not allowed to carry my photo backpack as hand luggage. It has also never been checked in this regard.
Why carry it as hand luggage at all? It is well known that the loading and unloading of suitcases on airplanes is not exactly squeamish. That’s why I prefer to carry sensitive items, such as my photo equipment and laptop, in my hand luggage. I stow the tripod wrapped in sweaters and jackets in the suitcase, which has worked well so far.
Tip: Apply the 80 / 20 rule when packing your photo equipment
The 80 / 20 rule from business says that 20% of your customers make up 80% of your sales. The other 80% of your customers make up only 20% of your sales. The obvious thing to do is to concentrate on the 20% of your customers who make up the lion’s share of your sales and to cancel the others. Then you continue to make 80% of your normal turnover with 20% of your work.
This rule can be applied to many areas of daily life. It is also interesting for packing my photo backpack. At the beginning of your photography you will probably want to take all the lenses you have, because you might need one of those lenses after all.
It’s worth making a monthly and a yearly selection of your photos – just your best images from that time. If you do this over a longer period of time, you will notice which lenses produce your best images. Probably there are only one or two lenses. The other lenses you always have with you, but rarely do you take a picture with them that makes it into your monthly or even yearly selection.
And now you can apply the 80 / 20 rule: Just take only the lenses you take your best pictures with.
For example, I’ve noticed over time that I’ve consistently taken my best landscape photography tour images with my Canon 10-22mm wide-angle lens. For me, instead of 80%, the rate is even higher. About 90 – 95% of my images from the year’s selection are taken in this focal length range. What have I learned from this? I practically only take the 10-22 mm as my only lens for my landscape tours.
3 basic rules to pack your photo backpack properly
- Heavy items as close to the back as possible
- Stow light things like the jacket at the bottom
- Tighten the contents
The first rule, of course, applies especially to the camera, lenses, and tripod. For example, I don’t use the actual tripod mount on the back of my Lowepro Flipside 500, but strap the tripod to the side (seen in the picture above). So that the backpack does not then skew to one side, I pack the heavier things like lenses in the backpack on the opposite side. On the „tripod side“ in the backpack I then have light accessories like lens hoods, cleaning accessories and remote releases.
If the structure of the backpack allows it, you can pack light things like the jacket down so the weight is stored a little more in the middle of the back. With this second rule, you’ll have some additional padding towards the bottom to rest the photo backpack on.
Rule three relates specifically to the tripod, which should be tightly tightened to the backpack. This is important so that it doesn’t move left and right while you walk, let alone tilt backwards. Otherwise, your body will have to keep working against it.
Photo backpacks for special applications
Photo backpack with daypack
As I wrote above, on a photo tour you usually need not only your photo equipment, but also things like food, drink, a thin jacket and some accessories. Meanwhile, there are photo backpacks that have a compartment for the photo equipment and a separate compartment for these additional things. This extra compartment is called a daypack in this case. As the name suggests, the things you need for a day on a tour fit in there.
Photo Backpacks for Hiking, Outdoor and Trekking
For longer tours, you need more storage space, because you need to carry more clothes and additional things. To accommodate all this and still carry the load well, there are again special models for hiking and trekking. As a rule, these backpacks are even better designed for ergonomics and have a good carrying system, which stores the weight on your hips.
Photo backpack with laptop compartment
If you want to take your laptop with you on a photo tour, a model with its own laptop compartment is important. A Lowepro Fastpack BP 250 AW II is a good choice here.
Photo backpack reviews
As already mentioned, the market offers a variety of different models. I recommend in any case to try out a few photo backpacks before buying from friends who also take pictures. There are not too many good and especially genuine photo backpack reviews on the web. However, you can find a good one at the colleagues of digitalPHOTO. In the meantime there is even a second review from digitalPHOTO. You can also find great information at Taschenfreak.de.
I hope this article was helpful for you. If you have any questions about photo backpacks or want to share your experiences with me, feel free to write me a comment!