What should you look for when buying a camera tripod? Which is the best tripod? Here comes a comprehensive guide with my current top 3 recommendations!
This article about tripods is very detailed. If you’re just looking for a quick recommendation, ahead this overview.
Why do I need a tripod?
You need a tripod if you want to shoot in low light. Above a certain exposure time, your pictures will probably be blurred if you take them handheld without a tripod. But how do you know when your photos are blurred? You can find the one-by-five rule of thumb below.
You always need a photo tripod when you take photos in low light or when you want to take long exposures. In most cases, it is used in landscape photography and architectural photography. The goal is always to take blur-free photos.
Will any camera fit on any tripod?
Just about any camera will fit on just about any tripod. The tripod threads are now standardized for digital SLR cameras, system cameras and also compact cameras. So you can say that the most common cameras fit on any common photo tripod. You don’t have to consider anything special here.
The most important criterion for me: weight
The ideal tripod is always a good compromise between its own weight and stability. A 200 gram tripod will be stable in the rarest cases, while a 5 kg tripod is almost always stable, but also heavy. The tripods I recommend below weigh between 1.4 kg and 2.7 kg. This aspect has a particularly high priority if you travel a lot. Below I give a tip, which is the best travel tripod for me.
What height is necessary?
Your tripod should be high enough so that you can look through the viewfinder relatively comfortably without the center column extended. This way you can shoot comfortably and focus on your composition without having to contort yourself. The height of the tripod that suits you depends on your height.
Twist locks or clamp locks?
In order to extend the legs of your tripod and then to fix them in place, locks are necessary. Clamp locks are usually used here. However, you also have the choice to purchase twist locks. I’ve used both closures and I can’t say I have a particular favorite.
Of course, it’s harder to get your fingers stuck on the twist lock. Some colleagues say they can set up tripods faster with twist locks, but when working with a tripod, I don’t really care about the two seconds longer set up time. My opinion: which closures you take doesn’t matter.
Pay attention to the load capacity
On the other hand, it does matter how much your camera and lens weigh. Every tripod has a fixed maximum load capacity. This load capacity should of course be higher than the weight of your photo equipment.
If you don’t pay attention to this value, it can happen that your image frame lowers during the exposure. Furthermore, if you put too much weight on the tripod, it can be damaged.
The difference between using wide-angle and telephoto lenses
Another rule of thumb: you need a more stable tripod for a telephoto lens than for working with a wide-angle lens. This is because with the long focal length of a telephoto lens, images can again shake more easily. This also applies to very small nudges on the tripod itself. Or even in situations with strong wind.
Telephoto lenses in combination with the tripod are used especially in wildlife and sports photography. In the meantime, I have published another separate article with my recommendations for this type of lens: Canon telephoto lens.
The packing size: The size for the transport (in the airplane)
You will also find another piece of information in the data of your new tripod: the packing size. These numbers mean how big your tripod is when folded. These data play a role if you want to transport your tripod.
Here you should see if your tripod will fit on your photo backpack or in your suitcase for air travel. For the transport in the airplane I usually unscrew the tripod head and transport both between my things padded in the suitcase. I always carry my photo backpack, a Lowepro Flipside 500AW, as carry-on luggage.
The choice between wood, aluminum and carbon
Tripods are usually made of three different materials: Aluminum, Carbon and Wood. All three materials have different properties and therefore advantages and disadvantages.
Properties of wood:
- Very stable
- Very low vibration
- High weight
Properties of aluminum:
- Low weight
- Reasonable price-performance ratio
- Robust
Properties of carbon:
- Very low weight
- Low vibration
- Comfortable to use without gloves in winter
- High price
Wooden tripods are used less in digital photography because of their high dead weight. Carbon or aluminum tripods are therefore recommended.
Is it worth the extra cost for a carbon tripod?
If you will be traveling a lot on foot with the tripod, such as in landscape photography, then you can save some more weight with a carbon tripod. Compared to an aluminum tripod, it’s about 20-30% less. Carbon tripods cost much more for that. A recommendable carbon tripod is the Manfrotto MT190CXPRO4. Since a few months I use the Manfrotto Befree GT Carbon. You can find more info about this tripod in my review.
Are spikes on the tripod feet necessary?
In my opinion, spikes are not absolutely necessary. Spikes are small metal spikes that can be extended from the tripod feet via a rotating mechanism. They are useful if you often work on slippery ground. In landscape photography, this is the case when you set up your tripod on snow, ice or mud. Most tripods have rubber feet that hold well on almost any surface. I have not experienced a situation in the last 10 years where I wished I had spikes. So for me, spikes are not a decision criterion.
Is the angle of attack of the legs important?
The angle of the legs is important in strong winds and for macro photographers. With some tripods you can adjust the angle of the legs. This makes the tripod wider and therefore more stable. At the same time, of course, it is lower. The angle means that you can spread the tripod legs further apart. I use this feature on my Manfrotto Befree from time to time when I’m shooting in very windy situations. Then the tripod has a little more grip.
This feature is also interesting if you are looking for a particularly low shooting situation, depending on the purpose. Many of my pictures are taken relatively close to the ground, with the tripod legs not extended at all. Such an image composition in combination with a wide-angle lens can create a lot of depth in the image. If I then get a little closer to the ground and the subject through the angle of attack of the legs, this can be quite helpful.
The shooting height and angle of attack are also interesting for macro photographers. So if your photographic world is focused on insects and plants, then you can get closer to your subjects with this feature.
When is a foldable center column worthwhile?
A foldable center column is especially worthwhile for macro photographers. As the name suggests, it allows you to attach your entire center column to the side of the tripod, rather than upwards. The center column can therefore be tilted by 90 degrees. This plays a role when you can’t set up your camera tripod directly on the subject, but a bit off to the side. With the tiltable center column, the camera then sits not centrally above the tripod, but to the side of it. This feature is available on the Manfrotto MT190XPRO4, for example.
Is it worth using the hook on the center column?
Using the hook on the center column is usually not worth it. Some tripods offer a hook at the bottom of the center column. This hook can be used to attach additional weight to the tripod to increase stability. It is conceivable, for example, to attach the photo backpack.
The colleagues came to the conclusion that it hardly makes a difference whether you hang additional weight on this hook or not. Based on this review, the hook on the center column is not a decision criterion for me.
A nice feature against cold hands: the sponge rubber coating
If you’ve ever had a tripod, perhaps made of aluminum, then you know the situation in winter. Below 0 degrees the material is very cold for your fingers. If you then carry the tripod without gloves and set it up, you will have really cold hands afterwards.
A remedy for this is a foam rubber coating. On some tripods, one of the legs is coated with it as a carrying option, on some all three legs. That way, your fingers don’t get so cold when you’re handling it.
It’s definitely not just a feature for warm weather enthusiasts – I can concentrate much better on photography and image composition when I feel comfortable doing so. Warm hands definitely contribute in the winter.
The one-by-one rule of thumb
As a guiding principle, the most you can hold out of your hand is 1/focal length.
Okay, now it gets a little technical. You can tell what focal length you’re using by looking at your lens. An 18-55mm lens has a focal length of 18-55mm, depending on whether you zoomed in or not. You can see which focal length you are using on the front of the lens.
Depending on the mode of your camera (e.g. A, P, AV, TV or M) you can see your exposure time in the viewfinder when you press the shutter button halfway. This can be 1/200 second, 1/50 second or even 1/10 second. The period of 1/200 second is much shorter than 1/10 second. At 1/200 second, you are much less likely to blur your image than at 1/10 second.
The longer the exposure time, the more likely you are to blur your image without a tripod. So, for example, if you take a picture with a focal length of 50mm, the most you can shoot without a tripod is 1/50 second. If you have an exposure time of 1/25 second, the image will probably be blurred. If you have an exposure time of 1/100 second with this focal length, then you will probably get a sharp image.
Lenses or cameras with image stabilizer will of course help a bit more. With image stabilizer, you can still keep an image with a 50mm lens at an exposure time of 1/10 second.
This rule of thumb applies to both APS-C and full-frame.
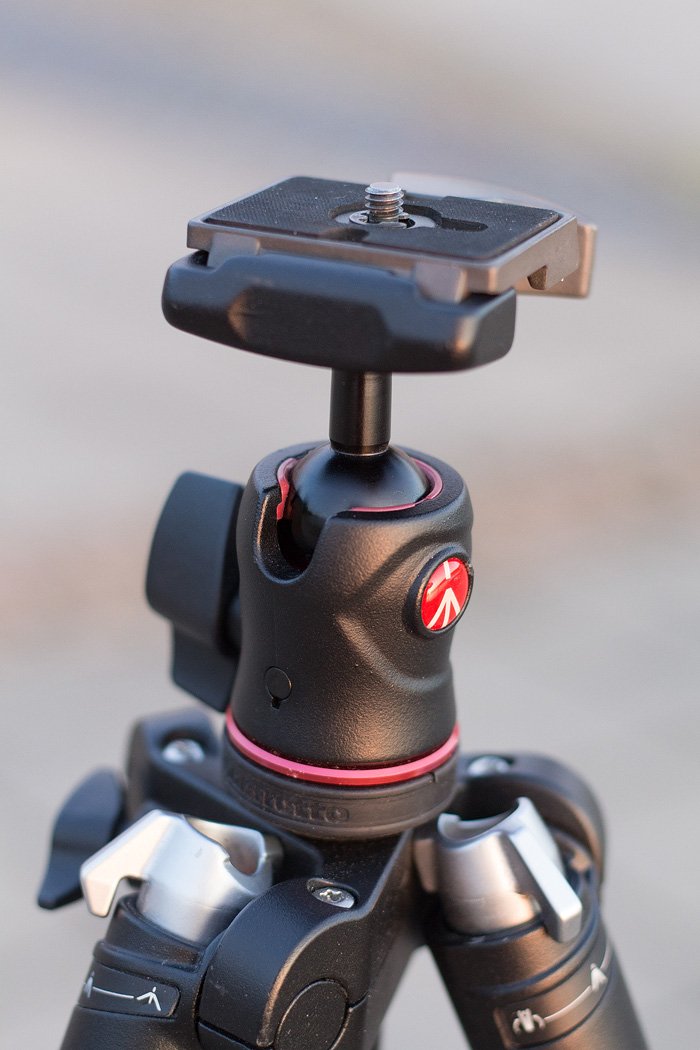
How to find the right tripod head
In principle, every tripod is basically made up of the tripod itself and the tripod head. Many tripods are therefore sold with different heads or generally without a tripod head to begin with. Below, I give tips on certain bundles that I find useful.
Many tripod manufacturers use what is called a quick release plate to connect to the camera. Here, each brand usually has its own system. The quick release plate can be removed from the head and screwed under the camera. When attaching the camera to the tripod, the camera and quick-release plate are simply hooked into the tripod head and secured. This takes less than a second. This technique also has the advantage that if you have several cameras, you can use several quick-release plates, each of which you attach to one camera.
Basically, it makes sense for many applications that a spirit level is integrated into the camera tripod itself or, better, into the tripod head. This way, the tripod and thus also the photos can be aligned straight. There are also tripod heads with spirit levels in more than one alignment, for example for two axes.
What tripod heads are available?
There are the following tripod heads: ball head, 3-way panhead, 2-way panhead, gear head and panorama head.
Ball head
With the ball head, the base of the head sits in a kind of joint. On top of this base sits the camera. The advantage of this head is that it can be adjusted quickly while maintaining good stability. The ball head is the most commonly used tripod head. How tightly the ball sits can be adjusted with a dial. A ball head is not quite as easy to use for precisely aligned panoramas, because when you move the image section, i.e. loosen the position, you also quickly change the height. Overall, though, it’s the most universal head.
3-way panhead
With a 3-way panhead, you can adjust each axis separately. This is useful when you want to align your images and thus the camera position very precisely. However, this process takes more time. When is this head useful? When you want to align your images to the millimeter. This can be useful for reproductions of paintings, or for architectural photography. Whenever millimeter accuracy is important, a three-way head is worth considering.
2-way tilt
A 2-way panhead reduces the adjustment possibilities to two axes. It is thus a simpler version of the 3-way tilt and is often referred to as a video head, as it is good to use for this purpose. So if you plan on shooting a lot of video, this head is especially good for you. It can be used to make smooth camera pans. By turning the long lever, you can operate the locking. I have unknowingly used a 2-way panhead for a very long time for my landscape photography. In this respect, this head is also suitable for photography.
Geared head
The geared head is basically a 3-way head, but the axes can be adjusted to the millimeter with a Machan gear. Accordingly, this head is suitable for very fine adjustments regarding the camera position.
Panorama head
If you shoot panoramas almost exclusively, then a suitable panorama head is interesting for you. The special feature here is a graduation, with which you can exactly determine the overlap for the individual images. Mostly, panorama heads have an integrated bubble level, so that you can align the horizon exactly. When setting up the tripod, it should be aligned exactly so that you don’t have any distortions in the image. If you now know your focal length exactly, you can shoot your panorama just by using the degree scale, because you can read exactly by how many degrees you have to turn further after shooting.
The tripod head is also standardized with respect to the thread, and almost any head will fit on almost any tripod.
My recommendation for the tripod head: The ball head – for example a Manfrotto 496RC2 Compact. With it you can adjust your camera completely free and relatively fast.
The best way to transport your tripod
There are basically three ways to transport the tripod when hiking:
- Carry it in your hand
- Carry it with a suitable shoulder bag
- Attach it to a photo backpack
I prefer the third option, because the tripod can be carried well over longer distances. Of course, when buying a photo backpack, you have to make sure that the tripod can be easily attached to it. Ergonomic aspects such as weight distribution or carrying the main weight as close to the body as possible should not be neglected.
Some manufacturers supply bags directly with the tripod. Alternatively, padded bags are also available.
Durability: Proper maintenance
The maintenance required for tripods is kept within limits. Every few years, I tighten the screws of the clamp locks a little. Theoretically, the lubrication of a ball head should also be renewed every few years, but this has never been necessary for me.
More importantly, you should rinse and dry your tripod after shooting in challenging situations. These include environments with sand and salt water. When I’m shooting at the ocean, it’s not uncommon for me to place the tripod legs directly in the sand and water to get my composition right. In the evening at the accommodation, I then take the tripod legs off again fully and put the tripod in the shower to rinse it off. This prevents sand from collecting in the leg segments and causing them to drag against each other the next time I set up.
Can I save a tripod and edit the image accordingly in Photoshop instead?
There are simply effects such as a long exposure that can’t be created via post-processing. You can also take pictures with a higher ISO to avoid having to use a camera tripod. But then the image quality suffers, even if you de-noise the image in post-processing. But the most important point for me is that a tripod makes me work slower. It practically forces me to do it. And so I put more thought into my photos and the images get better.
Special tripods
Below I have described some special tripods that might be interesting for you, depending on their application.
Gorillapod
A special type of tripod is the Gorillapod. It has flexible legs made of plastic and can be used to attach to things like fences or trees. The Gorillapod is relatively light at about 200 grams, making it practical for traveling. The disadvantage is that you are very limited in terms of camera position. Of course, this tripod can also be set up directly on the ground. The maximum load capacity is 1 kg, so it is only suitable for smaller cameras.
Mini tripod / table tripod
For situations on birthdays or just to have the compact camera with a small tripod there are the mini tripods. These tripods are usually only about 10 cm high and have a low load capacity. For ultimate low weight in combination with a compact camera it is worth to have a look at a mini tripod.
These mini tripods are also called table tripods because they can be taken to a party and placed on the table for a group photo. Not every table tripod is particularly stable. But there are also some representatives of this category that you can also use for a long exposure outdoors.
In September I was on Mallorca and had only my Fujifilm X100F with me. I wanted to have only light equipment with me, so I limited myself to this camera. As a landscape photographer, I know, however, that it is then on site again and again in my fingers itch. Therefore, I had bought the Manfrotto Pixi shortly before.
If you find a wall or something similar, you can place this mini tripod on it. I made a long exposure of the rocks, which were illuminated from the side of the sunset. The Pixi tripod worked without problems, the image was crisp. So if you need a small and light tripod and a good place to set it up, such a table tripod is a good alternative.
Monopod
Monopods are especially popular in sports and event photography. Here, you practically only have one tripod leg to support the camera. This is useful for longer focal lengths of telephoto lenses. Of course, it is not suitable for long exposures. The advantages of a monopod over a tripod are the low weight and the fact that you can change the position where the tripod is needed very quickly.
Tip for stability: Keep the center column retracted
With almost all tripods, the center column can be extended to use the maximum height of the tripod. However, a fully extended center column in particular takes away some of the stability of the photo tripod. Therefore, I generally recommend to use the center column only in exceptional cases.
What is an L-rail and when is it worthwhile?
An L-rail is a rail that allows you to attach your camera to the tripod quickly and precisely in portrait and landscape format. To attach the camera to the tripod head, a tripod plate is usually used. You screw this plate onto your camera and then hook the camera and plate onto the tripod head as needed.
An L-rail is useful if you often switch between portrait and landscape mode. It is a rail that is attached to the camera similar to the plate. You can switch between portrait and landscape format without having to tilt the tripod head to the side. This ensures that you have relatively little shift in the image section when switching.
An L-rail must always be purchased individually for the respective camera so that the connections on the camera remain free.
When am I allowed to use a tripod?
In Germany, you are generally allowed to use a tripod on public ground. In Germany, the freedom of panorama generally applies. This means that you are allowed to take pictures with a tripod on public ground. As soon as you are inside buildings and on private ground, I recommend that you find out if you can use a photo tripod before taking pictures.
A typical example is churches. In some cases you can buy a photo permit for a small fee. But I would ask in any case before.
Abroad, the freedom of panorama does not exist throughout. It’s always better to check beforehand than to then deal with police or security personnel.
My tripod review – I have already used these products
I have used various tripods over the past 15 years. In addition, I have been able to try out new tripods from time to time at the homes of photographer friends. Out of these tripods, three models have emerged that I would recommend. All three tripods are Manfrotto models, because I am simply super satisfied with the quality and the price-performance ratio of this manufacturer.
So strictly speaking, this is not a real tripod review, I’m showing you my personal recommendations here.
Which is the best tripod?
The current best tripod is the Manfrotto Befree. But this is only my personal opinion. I use it 95% of the time, because I’m on foot a lot and for me the weight plays a decisive role. I find it also offers a good price-performance ratio. The Befree is also available as a carbon variant. Due to the low weight, it is also the best travel tripod for me.
Do you still need help? What are your experiences with tripods? Write me in the comments!