Are you looking for an DSLR camera for beginners? I’ll show you what’s important! There is a lot of information and tips that you should consider before buying.
I have been taking photos for more than 15 years, mainly with an DSLR camera for beginners. During this time I have used different cameras, lenses and accessories. With my knowledge I would like to help you with the decision to your new DSLR camera.
If you don’t want to read it all, you’ll find my three current recommendations in the lower part of this article.
Contents
Important preliminary considerations for an DSLR camera for beginners
Pick up the camera
One of the most important tips is to put the camera in your hand. Pretty much all of today’s DSLR cameras are on a high technical level.
In order to enjoy photography, you should also enjoy your camera. It should sit well in your hand and feel comfortable.
That’s why I can only advise you to go to your nearest electronics store or photo specialty store and take the DSLR cameras for beginners in your hands.
Look through the viewfinder, click through the menu and take a few pictures. Just as important for you can be the sound of the camera when you release the shutter. Just try it out. That way you’ll get a first feel for your new camera. Everyone has different preferences.
Why you should not take the cheapest camera
As I wrote above, even inexpensive entry-level cameras like a Canon EOS 2000D are on a good level today. So why do I advise against taking the cheapest model?
If you shoot for a while after you buy it, then you will progress. That may be the case after a few weeks or months. Then there may be features you’d like to have on your camera, but it doesn’t come with. At that point, your camera may be limiting you.
That’s why I advise you not to take the cheapest DSLR camera, but to go one level further. This way you will have something from your camera for a longer time and you don’t have to look for a new model after half a year. As written above, I’ve been shooting with these cameras for 15 years – also because I don’t miss anything about them that a bigger camera would do much better.
If you want to save money and still have such an DSLR camera, then I recommend buying a used camera. Further down I have two recommendations on which models make sense there.
Why the price-performance ratio of DSLR cameras for beginners is right
I call the cameras that are not the cheapest, but are one step higher, upscale entry-level cameras. These cameras already bring many features of the mid-range and professional models. The price-performance ratio for the upscale entry-level cameras is therefore extremely good.
What are the advantages of more expensive cameras?
A more expensive camera essentially has the following features, which make things a little easier for people who take photos more often:
More robust
Mid-range and professional cameras often have a magnesium housing instead of a plastic one. This is much sturdier and can withstand the occasional drop. These cameras are also sealed, so working in very humid, dusty and sandy environments is no problem.
Faster
The higher-end entry-level cameras are faster. This means that they store faster and take more pictures per second. This point is important for sports and event photographers, for example.
Better operation
Additional controls make it easier to use mid-range and professional cameras on a daily basis. With a thumbwheel, certain settings can be made faster than with a joystick. Often, a larger camera also feels better in the hand.
Larger viewfinder
The small window you look through on an DSLR camera is called a viewfinder. On more expensive cameras, the viewfinder is usually larger and brighter, making it easier to compose images.
Larger sensor
The larger sensor on mid-range and professional cameras makes for better image quality and a blurrier background in portraits.
More megapixels
Professional cameras sometimes have more megapixels, giving professional photographers the ability to print their images larger. By larger, I mean two meters and up. With more megapixels, you also have more reserves for cropping before the image becomes blurry.
However, you don’t need many of these features as a beginner. So why am I still shooting with an entry-level DSLR?
- I have never dropped my camera in the last 15 years.
- As a landscape photographer, 3 frames per second is perfectly sufficient for me, which is what every DSLR camera packs today.
- With my motifs, it is not important that I make the settings particularly quickly. That’s why I don’t miss a thumbwheel.
- I often do my image composition with the tripod and the camera’s screen, so a large viewfinder is not relevant for me.
- According to my own tests, the image quality of larger sensors is not so much better that I want to pay three to four times as much for it. I am absolutely satisfied with the image quality of my current entry-level DSLR.
- For my exhibitions, I don’t make prints larger than 90 x 60 cm. Therefore, the megapixels of entry-level DSLR cameras are perfectly sufficient for me.
These reasons are very subjective. I have had many different cameras, including professional cameras. I ended up with the upscale entry-level cameras again, because I’m just super satisfied with the image quality and the price-performance ratio is right here. And if the camera really breaks down, then I can replace it financially much easier.
What are the differences between an DSLR camera and a compact camera?
Now you may already have a compact camera and wonder what will improve for you if you buy an DSLR. Your new camera will probably:
- offer more manual adjustment options
- have a much better image quality
- offer the possibility to use different lenses
- have a much better handling
- give you the possibility to print your pictures much larger with better quality
- be able to take pictures with blurred background
- offer the option to use wide-angle lenses
- offer the flexibility and higher image quality of the RAW format
- allow the use of filters on the lens
- be faster and
- have a faster autofocus
An DSLR camera, no matter what class, will definitely offer you a big step up from your previous compact camera. However, in addition to the price, you must also realize that the DSLR is much larger and heavier.
Lighter and smaller: mirrorless system camera as an alternative
So far, I’ve been talking about DSLR cameras the whole time. But now there are more and more options to get the image quality of a DSLR with less weight and size in a body. Mirrorless cameras, also called system cameras, often have the same sensors as a DSLR, but do not have an DSLR system. This allows them to be built smaller.
Without an DSLR system, there is of course no optical viewfinder, but a digital one. Is that an advantage or disadvantage? This assessment is again completely subjective. Both viewfinders have their merits, so again I recommend: try it out yourself in the store.
Lately, the question of deciding between DSLR or system camera has been reaching me more and more often. I think that both systems will continue to exist in the future. Mirrorless cameras offer the same image quality with lighter weight and smaller dimensions. If you shoot subjects that require fast autofocus, the DSLR cameras currently still have a small advantage. The autofocus is faster and more accurate on these cameras. This approach therefore plays a role in animal or sports photography, for example.
My recommendation for a mirrorless camera is currently the Sony Alpha 6000. I have in my circle of friends so some satisfied users of this camera. If your budget is bigger, the more advanced Sony Alpha 6500 is a good choice. More on this topic can be found in my article about system cameras for beginners. Currently, the choice of lenses for system cameras is still somewhat smaller and sometimes more expensive than for DSLR cameras.
I will write about DSLR cameras in the following. Further down in the article, I also recommend a very small and lightweight DSLR camera.
Features of a digital DSLR camera for beginners
Decisive criteria – What do I have to pay attention to?
Everyone has different needs. So everyone will have different points on which he determines a good camera. Therefore, I will try to keep it relatively general.
The camera should…
- deliver a good image quality.
- be intuitive to use.
- be fast enough.
- have a large screen.
- have enough megapixels.
- have a sufficiently large viewfinder.
- have a good autofocus system.
- fit well in your hand.
- have a sufficient battery life.
- use a camera system in which there are a sufficient number of interchangeable lenses.
- use lenses that don’t make you poor.
- use RAW files that are supported by Lightroom and Photoshop.
- Have an accessory program that fits what you want.
That’s a lot of points, huh? Here’s the good news: 95% of current entry-level DSLR cameras offer all of these features. So it will be hard to make a bad decision regarding your choice.
Have weight & size on your radar
As written before, an DSLR camera offers many advantages over a compact camera. However, if you are planning to buy such a camera, you have to be aware that you will no longer be carrying around the 250 grams of your compact camera, but that it can quickly become 1 to 1.5 kilograms.
You should also consider the size. You can put a compact camera in your jacket pocket without any problems. That’s not possible with a DSLR. For a DSLR including lenses and accessories, you almost always need an extra bag that you have to carry with you.
On the other hand, it also makes your own photography much more serious. You approach photography differently when you have a big camera with you.
How many megapixels are necessary in a DSLR camera for beginners?
I’ll say it right up front: when I look for a new camera today, I practically don’t care about the number of megapixels. Why is that?
First of all, you have to ask yourself why more megapixels are better.
As a small comparison, my current cell phone has 12 megapixels. My old Canon EOS 450D also has 12 megapixels. Does this mean that the image quality is equally good? No. The image quality of the DSLR is of course better. Nevertheless, there are smartphones with very good cameras today.
So, more megapixels do not mean better image quality.
More megapixels are interesting if you often make large-format prints. By large format, I mean larger than 90 x 60 cm. I regularly do exhibitions. It rarely happens that I print larger than this format. Even the image quality from my old 450D with 12 megapixels looks terrific in 90 x 60 cm print size. Most current entry-level DSLR cameras are 24 megapixels.
„Cloud Launching Pad“ in an exhibition – A print from 12 megapixels.
So I would say that 95% of photographers don’t need more than 12 megapixels.
With more megapixels, you also need better lenses that can handle that resolution in the first place. Also, the files get bigger, so your PC or laptop needs more power to process those files smoothly. It doesn’t make much difference if your new entry-level DSLR has 18 or 26 megapixels. But from 35 megapixels upwards, these issues become relevant.
If you look at the current camera market, even the cheapest entry-level DSLR has 18 megapixels. Therefore, the number of megapixels is practically not a buying criterion for me.
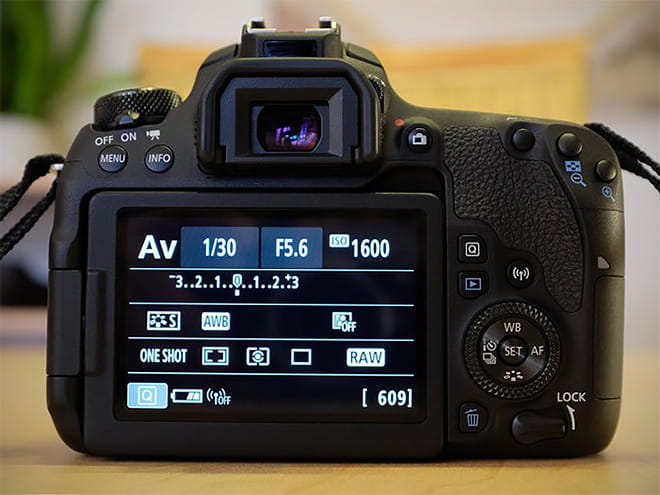
Why I love the folding display
One feature I’ve come to appreciate a lot over the past few years is the handy folding display. I take 90% of my pictures from a tripod. In doing so, the tripod is often set up just above the ground. Looking through the viewfinder then requires some acrobatics or dirty knees. With a folding display, however, this is quite comfortable. This is particularly noticeable in landscape and architectural photography.
I also prefer to do my image compositions in Liveview on the display rather than in the camera’s viewfinder. When Liveview first came on the market, it was still laughed at by many photographers. Today it is an important tool for difficult camera positions or situations where the focus or the composition must be exactly right.
The manual setting options of a digital DSLR camera
A big advantage over many compact cameras are the manual setting options on an DSLR camera. You are not forced to use the settings suggested by the camera, but can intervene creatively yourself. For example, you can choose the aperture, ISO and time yourself. In this way, you can have a much more targeted influence on your images. Every current DSLR camera for beginners offers you the possibility to make your settings manually.
Maybe you are also afraid that the operation of your new DSLR is too much for you? Then I can reassure you. Like any other camera, a DSLR for beginners also comes with an automatic mode. So it’s possible that you start with this mode and gradually warm up to the camera. When you feel comfortable with it after a while, then you can move on to the semi-automatic modes. Here you can choose either aperture or shutter speed and the camera itself calculates the appropriate counter value for the right exposure. So you slowly get a feeling for these settings. Once you’re comfortable with them, you can move on to manual mode to let your creativity run wild.
Lenses – what you need to know to get started
Is the kit lens usable?
In the past, you’ve often read on the web that the kit lens doesn’t provide good image quality. It was advised to buy another lens right away or to replace the kit lens first.
I do not share this attitude. There are several reasons for this. Today’s kit lenses are very good. A Canon EF-S 18-55 STM IS puts many other lenses in its pocket in terms of quality. The price-performance ratio here is simply phenomenal.
Kit lenses weren’t bad in the past either. It’s like having your own camera: you just have to know how to use it. If you choose the right settings, the kit lens brings great image quality. I still use said 18-55 STM today and am very happy with it.
Now there are quite a few lenses available to buy in combination with a new entry-level DSLR. Here you have to know which focal lengths can work from an optical point of view and which ones are bound to produce muddy images. Therefore: not all kit lenses are the same.
Avoid soup zooms: How to find out if a lens delivers good image quality
In the past, there were no zoom lenses in photography. Each lens had only a certain focal length, i.e. a certain angle of view. If you wanted to have multiple angles of view, you had to carry different lenses.
Lenses with a very large zoom range are disparagingly called soup zooms. This is because the image quality of these lenses is not particularly good.
Zoom lenses work with selective lens shift and thus allow different image angles. However, this lens shift has its limitations. It is optically very difficult to deliver good image quality over a particularly large zoom range with a lens. This is simply due to the laws of optics.
As a rule of thumb, the lens should not have much more than a fourfold zoom.
What does that mean exactly?
The final focal length should not be much more than four times the initial focal length.
For example, a very popular focal length for kit lenses is 18-55mm.
Final focal length / initial focal length = zoom range
55mm / 18mm = 3.05 times the zoom range
So with such a zoom lens you can expect good image quality.
Let’s take an 18-200mm lens as a counterexample.
200mm / 18mm = 11.11x zoom
Such a large zoom range cannot go hand in hand with good image quality for optical reasons. Lenses with such a zoom range are convenient when traveling, since you only need to carry one lens, but they negate the image quality advantage of a DSLR.
Remember: a zoom lens shouldn’t have much more than a 4x zoom to keep image quality good.
If you know this calculation, then you can assess whether the image quality is right with the various kit lenses that are available for the camera of your choice.
Why I advise you as a beginner to use the 18-55mm lens
If you don’t know yet what you want to photograph, then I advise you to buy a beginner DSLR camera with a 18-55mm kit lens. After the last 12 years in photography, I feel this focal length range is very universal. You can shoot both landscape and portrait with it.
Another cool thing: many of today’s 18-55mm kit lenses have an image stabilizer, so you’re less likely to blur.
Usually, when you start your photography, you don’t know what your favorite subjects will be. And you don’t have to. In the beginning, you know for yourself that you want to do more in your new photography hobby. Therefore it is good to have a universal lens with which you can try out many photo directions.
So my advice is to take a DSLR with an 18-55mm lens and try as much as you can in your first year.
- Go to the coast or the mountains.
- Ask a friend if you can photograph them.
- Go to a soccer game and photograph people in motion.
- Take pictures of buildings in the city.
- Take abstract pictures of everyday things.
- Take pictures of fireworks.
- Go to a park and get inspired there.
- Photograph insects in a flower meadow.
- Develop your own ideas about what you want to say and show with your photography.
The 18-55mm lens works really well for this time. After a few months, you will probably develop one or more photography styles that you like the most. When that happens, you can analyze your best images up to that point and see which focal lengths you used to take those images. Most of the time, a tendency will emerge, so that you can then look for a new lens.
You don’t always have to travel far to take pictures
It’s not meant to be a rule, but if you shoot landscapes, you’ll probably shoot a lot at 18mm. Then a wide-angle lens may be interesting for you in the future. Are you shooting a lot of portraits at 55mm in your first year? Then an 85mm fixed focal length could take you further. Or maybe you shoot a lot of street scenes at 30mm? Then a fast 30mm fixed focal length might be interesting for you. I give even more recommendations in my post on Canon fixed focal lengths.
You won’t know what you’ll specialize in until you’ve been shooting for a while. Therefore, just go with the 18-55mm. Be as active as possible and take in all the fun that photography has to offer!
What is light intensity?
In the course of this, I still need to talk about the concept of luminous intensity. Luminous intensity figuratively indicates – depending on the focal length – how much light can pass through the lens onto the sensor. For example, with a 50mm lens at f/1.4, you can still shoot in darker situations without a tripod than with a 50mm lens at f/2.8. The aperture is always specified by the manufacturer in the lens designation. So a 50mm 1.4 is faster than a 50mm 2.8.
These types of lenses exist
In photography, there are different lenses, which are usually differentiated according to their focal length, i.e. their angle of view.
Basically, there are the following types of lenses:
Wide-angle lens
A lens with a particularly wide angle of view, popular in landscape and architectural photography. Example: Canon EF-S 10-22mm.
Standard zoom lens
A normal zoom lens, such as the 18-55mm on an entry-level DSLR camera. It offers both a slight wide angle and a slight telephoto. Example: Canon EF-S 17-55mm 2.8.
Telephoto lens
A lens that allows you to take large shots of more distant subjects, such as animals or athletes. Example: Canon EF-S 55-250mm STM.
Macro lens
A lens that allows you to get extra close to subjects. Popular for flowers, insects and small details. Example: Canon EF 100mm Macro.
Fixed focal length
A lens that has only a certain fixed focal length, i.e. a fixed angle of view. Fixed focal lengths are often faster than zoom lenses and usually have better image quality. Example: Canon 50mm 1.8 STM. (You can find my review of the Canon 50 1.8 STM here)
Pancake lens
A particularly flat designed fixed focal length, flat like a pancake. Pancake lenses are usually not quite as fast. Example: Canon 24mm 2.8.
Fisheye lens
A wide-angle lens in which the farther the lines are from the center of the image, the more curved they appear. Canon EF 8-15mm Fisheye.
Tilt & Shift Lens
A lens in which the plane of focus and the plane of shift can be adjusted relative to the sensor. Used especially in landscape and architectural photography. Example: Canon TS-E 24mm.
Is an image stabilizer useful?
An image stabilizer ensures that your pictures do not blur so easily, even without a tripod. Therefore, an image stabilizer is always useful if you shoot without a tripod. In principle, of course, it always makes sense that you shoot with a tripod, also to take the speed out of photography and to think more about the image.
How can you tell if a lens has an image stabilizer or not?
By the lens designation. The designations vary among manufacturers, so here’s an overview:
- Canon: IS
- Nikon: VR
- Sigma: OS
- Tamron: VC
- Panasonic: OIS
- Pentax: SR
- Sony: OSS
- Fujifilm: OIS
Should I rather take a fast lens or one with image stabilizer?
At some point, you may be faced with the choice of whether you’d rather choose a fast lens or one with an image stabilizer. If you want to shoot a lot of portraits and it is important to you that the background is blurred, then I would rather advise a fast lens. This also matters if your subjects are moving, such as when you’re photographing animals. If, on the other hand, you’re dealing with subjects that don’t move, then I’d advise a lens with an image stabilizer. For me, as a landscape photographer, the advantage is obvious: I can still shoot without a tripod even in lower light.
As an example: If I have a lens with f/4 and, on the other hand, one with f/2.8, that means the lens is one stop faster. In practice, this means that in the same light you would shoot the scene with the f/4 lens at 1/25 second, and with the f/2.8 lens at 1/50 second. One f-stop more speed, i.e. f-stop 4 compared to 2.8 means half the exposure time. The aperture on the lens is larger at 2.8 than at 4, so the difference between f/2.8 and f/4 means an advantage of one stop. But an image stabilizer today will catch around 3 stops of light before you blur. For me, that means I can still easily hold 1/10 second without a tripod with my 50mm lens without blurring.
Summary: Moving subjects – rather pay attention to light intensity, stationary subjects – rather take the image stabilizer.
Can I still use analog lenses?
Maybe you still have lenses from the time of film photography or you want to switch to digital photography right now. In principle, almost all old lenses with an appropriate adapter will also fit the new digital entry-level DSLR camera.
The problem is that the image quality of the old lenses with a DSLR is not very good anymore. In analog photography, it’s not quite as bad if the light rays hit the film at a bit of an angle. A digital sensor, however, consists of several layers. If the light rays hit here at an angle, the image will be blurred.
Conclusion: Basically, old lenses can still be used. However, for the sake of image quality, you should switch to newer lenses.
I recommend these accessories for beginners to the DSLR camera for beginners
If you buy your first DSLR camera, then I recommend to include some accessories for the beginning, so that you can start successfully right away.
Should I buy an additional battery right away?
As a landscape photographer, I always use two batteries for my camera. One is always in the camera, the other is fully charged in the photo backpack. When I go on a tour that lasts one or more days, I shoot until the battery in the camera is empty. Then I switch to the full battery and recharge the empty battery in the evening at the accommodation.
According to current tests, it makes sense to keep the battery level between about 30% and 80%. This is how you achieve the longest battery life. So my approach is not quite ideal.
If you only have one battery, you’ll probably charge it before each trip, since you don’t want to run out of power while shooting. However, almost never draining a battery, but always recharging it, doesn’t help its lifespan much.
So I would recommend buying a second battery in addition to the one that comes with the camera. I usually use original manufacturer batteries, even if they are a bit more expensive. I bought the batteries for my Canon EOS 450D at the beginning and didn’t have to replace them once in 5 years.
But other manufacturers also build good batteries that are cheaper.
How many memory cards in which size do I need?
How many memory cards you need is of course strongly dependent on your photographic habits. On my Scotland trip, I took about 300 pictures in a week. Some portrait photographers shoot that many images in a day though.
I take here as an example the files from my previous Canon EOS 700D with 18 megapixels, which also belongs to the class of DSLR cameras for beginners. I can choose whether the camera should save JPG files or RAW files.
RAW is the camera’s raw file format, which requires its own post-processing, but offers much more options. I shoot in RAW format 98% of the time.
According to the camera display, about 2350 photos in JPG format or about 630 photos in RAW format fit on a 16 GB memory card.
I use a 16 GB card in the camera, but I never actually fill it up. I always have a second 16 GB card in case the first card is full. So if you take two 16 GB memory cards to start with, that should be enough. You can always buy additional memory cards. When buying a memory card, you have to consider which card you need for your camera. In most cases this should be SDHC or SDXC. I have created an overview here, which memory cards fit for which cameras.
Why the memory cards should definitely be from a brand manufacturer
With the batteries it is not so bad, if one breaks, it can be replaced easily. It is much worse if the memory card is defective and your photos, in which you have put so much effort and heart blood, were not stored correctly. I therefore advise to use only memory cards from brand manufacturers.
I have had good experiences with SanDisk memory cards. So far I had only once a defect there, but it was replaced without discussion within a week. I was also able to reconstruct the pictures with the included Rescue Pro software.
Worth mentioning here is still the approach that some photographers follow: Rather use several small memory cards. If one of them fails, then not all pictures are immediately gone.
Tip: Protect the front lens – is an UV filter worthwhile?
In various buyer’s guides and recommendations, one reads again and again that one should screw a clear glass or a UV filter in front of the lens. The problem with this is that the light has to pass through an additional glass again. If you buy a good lens and then screw a cheap filter in front of it, you might ruin the image quality.
I would rather advise you to buy a lens hood right away. This reduces reflections in the lens in certain light situations and thus ensures clearer images. By the way, it also serves as a protection, because in case of an impact the lens hood is hit first and not the glass of the front lens of the lens. You can find out which lens hood is the right one for your lens on the respective manufacturer’s page.
Is an additional flash necessary?
If you want to work in the area of portrait photography, an additional flash is certainly interesting. However, the same applies here as for the other recommendations: I would first try out how you get along with the internal flash and whether you want to use a flash for your portraits at all. Therefore, you can buy an external flash later.
Which bag do you recommend?
In the beginning you usually only have the camera itself and some accessories. Then a small bag like the Mantona Colt is sufficient. If you want a little more space, then the AmazonBasics camera bag in the size Medium is recommended. In the meantime, I wrote another really detailed post on camera bags.
Is a battery grip worth it?
A battery grip makes the camera bigger and heavier. If you like having more in your hand because it makes the camera feel more valuable to you, a battery grip (BG) is interesting for you. But even if you have big hands like I do, your little finger won’t get stuck with a BG. So the handling improves quite a bit with it. In addition, most battery grips can hold two batteries, so you can shoot longer. With a BG, you can also shoot in portrait mode and still grip the camera from the side instead of from above or below.
Bottom line: if you have big hands or will be shooting a lot in portrait mode, then a battery grip may be worth it for you.
When is a tripod useful?
A tripod will help you when you want to shoot in low light. Common situations include twilight, night shots, or photos in darker interiors. A tripod is then necessary so that the photos are not blurred. In landscape photography, for example, a tripod is often useful because the most beautiful light occurs around sunset and sunrise. That’s when longer exposure times occur that you can’t handhold without shaking, even with an image stabilizer. A good tripod to start with is the Manfrotto Befree Advanced Alu. For more info on tripods, check out my tripod guide.
A tripod also weighs quite 1.5 kg. Be aware that you have to take this weight with you on the next photo tour. I, too, often find this a nuisance. But working with a tripod is incredibly relaxing. My pictures with a tripod are almost always better than without. The reason is that I am then more occupied with my subject. I also give more thought to the composition of the image. These two points alone lead to much better pictures. That’s exactly what makes the effort and the extra weight worthwhile.
Include software for post-processing
There are very different views on the extent to which post-processing is part of photography. For me, photography is a creative medium in which I want to realize my ideas and do so without restrictions. Just to edit RAW files, image editing software is necessary. If your camera comes with Photoshop Essentials, then you can take the first steps with it.
Many instructions and tutorials on the Internet refer to Adobe Photoshop and Adobe Lightroom. It is the most widely used image editing software. I also use Photoshop for post-processing my images. The Adobe photography program costs 13 euros a month, which I think is very fair considering the power.
If you want to get into photography, then of course you should have this cost in mind. There are other programs for image editing besides Lightroom and Photoshop. You can find a list of alternatives here.
Summary accessories – my recommendation
So for starters, in addition to the camera, I would recommend a second battery, two 16 GB memory cards and a bag. In addition, a subscription to the Adobe photography program is useful.
Things to know about entry-level DSLRs
What is crop factor, APS-C, DX and fullframe?
There are different image formats in photography. The 35mm format is known from analog photography. The photo of a 35mm format film has the dimensions 24 x 36 mm.
A digital sensor of the same size is called a full-frame sensor because it has the same dimensions. The sensor is one of the most expensive components of a DSLR. Entry-level DSLR cameras have an APS-C sensor, which is slightly smaller than 24 x 36 mm. These sensors can be produced at a lower cost.
Common sizes are for example
23.7 x 15.6 mm = crop factor 1.5 – common with Nikon (DX)
22.2 x 14.8 mm = crop factor 1.6 – common with Canon (APS-C)
The Canon sensor on entry-level DSLR cameras is therefore 1.6 times smaller than a full-frame sensor.
APS-C is the designation for a crop sensor at Canon, at Nikon it is called DX.
What does the crop factor mean for the focal length?
A lens always illuminates the same angle of view on the sensor plane. Depending on the size of the sensor, however, only part of it is captured. With a smaller sensor, therefore, the outer part of the image is not recorded as well.
You can imagine it like this: A lens always delivers a round image, which arrives at the level of the image sensor, also called illumination circle. A photo sensor, however, is known to be rectangular. So the sensor is placed in the center of this round image to catch the light there. If the sensor is smaller, then it will also catch a smaller angle of view.
Illumination circle of a lens with sensor sizes
The focal length specifications of lenses always refer to full-frame size. A 50 mm lens on a Canon camera with crop factor 1.6 has an angle of view like an 80 mm lens on a full-frame camera (50 * 1.6 = 80).
Thus, a kit lens with a focal length of 18-55mm on a camera with crop factor 1.6 gives about the same angle of view as a 28-90mm lens on a full-frame camera.
EF-S lenses, for example, can only be used on crop cameras because they illuminate a smaller image circle. Conversely, however, all lenses that are suitable for full-frame can also be used on crop cameras.
Nikon offers the possibility to use DX lenses on its full-frame cameras by using only the middle part of the sensor and thus reducing the number of megapixels.
How do I get a blurred background?
This characteristic depends on three factors.
Larger sensor
You get a blurred background the larger the sensor is. Compared to a compact camera, the sensor of an entry-level DSLR is already very large. Therefore you can achieve a blurred background.
Lens with higher speed
The faster the lens, the more you can blur the background. So a lens with 1.4 will have a softer blurred background than one with an aperture of 4.0.
Longer focal length
Background blur depends on the focal length. With a wide-angle lens, the plane of focus is quite large, so the background is relatively sharp. With the longer focal length of a telephoto lens, you already have a blurrier background with the same speed / aperture because the plane of focus is smaller. More focal length = more blurred background.
SLR camera comparison: Is Canon or Nikon better?
This question is often discussed and no longer only refers to Canon or Nikon. In the meantime, various other manufacturers are also increasingly becoming the focus of discussions. However, the truth is: almost all of today’s DSLR cameras are consistently very very good. The differences are in the range of the last 10%. Therefore, it is not worth discussing which manufacturer is better.
No matter which camera you choose: In the end, it’s only important that you know the camera well.
Inside and out.
If you can operate the camera in your sleep, then you can concentrate on what is happening in front of the camera. Because that’s how the really good pictures are taken.
The photo equipment is just a tool. What’s more important is what you think about your picture, what ideas are behind it and how you convey what you want to say to the viewer of your pictures.
Videos with the DSLR
Due to demand, many of today’s DSLR cameras can also record movies. The quality of these is very good. For example, the second season of Dr. House was filmed entirely with a DSLR.
I rarely use my DSLR camera for filming. But I know from various test reports that the DSLR cameras for beginners are also very well suited for this. Again: Don’t take the cheapest one, then you have very good conditions. Almost all of them now offer Full HD quality, and the newer models also deliver 4K resolution. If you plan to record more videos with your new camera, then a feature like a port for an external microphone can be important.
My recommendations for the best DSLR camera for beginners sorted by budget
SLR camera for beginners under 300 Euro – used
For 300 Euros I would advise you to buy a used DSLR camera on eBay. For example, a Nikon D5300 or a Canon EOS 700D, each with 18-55mm kit lens. When buying, make sure that the number of releases is below 20,000. This is something like the mileage on a car. In some auctions, this value is not directly stated in the item description. Just ask the seller directly, so you have a clue.
With a little patience you can get a camera for about 240 Euros, then you can invest the rest of the money in a memory card, two new batteries (the old ones might not be the best anymore) and a bag. But also whole sets for around 300 euros can be found here.
Another idea is the Canon EOS 100D, which is currently available with 18-55 mm lens for €150-200 on eBay. This is a particularly small DSLR camera, but in terms of functionality it can do almost the same as the 700D mentioned above. So if you want something less weight and size, the 100D is worth considering.
SLR camera for beginners for about 700 Euro – New
For 600-700 Euro you can get a new and very good DSLR camera for beginners. I recommend two models: the Canon EOS 800D or the Nikon D5600. Both have all the features you need and come with an 18-55mm kit lens with image stabilizer. They offer manual settings, an interchangeable lens and deliver very good image quality.
- Canon EOS 800D
- Nikon D5600
An alternative to the Canon EOS 800D is its successor – the Canon EOS 850D. The 850D is a bit snappier in terms of continuous shooting and buffer. So if you shoot fast subjects like in sports, it may be worth considering. The exposure metering has also been changed, but I don’t think that makes much of a difference. More exciting, however, is the improved video function – the 850D can shoot 4K video at 30 fps, while the 800D can „only“ manage 1080p. So if your focus will be on video, then the extra price for the Canon EOS 850D may be worth it.
Why do I still recommend the 800D above? Currently, the Canon EOS 800D is still around €100 cheaper than the Canon EOS 850D, which leads to a much better price-performance ratio in the end. Therefore, the 800D remains one of my top 3 recommendations for an DSLR camera for beginners.
Particularly small DSLR camera: Canon EOS 250D
If weight and size are very important to you, then a particularly small DSLR camera may be right for you. The market doesn’t offer much choice here, so the choice is easy. I recommend the Canon EOS 250D. Even its predecessors were showered with awards. Here you get a complete DSLR camera with a very small body that can almost keep up with system cameras. Technically, you don’t have to make any compromises. So if you want to save space and are looking for a light and small DSLR camera, the Canon EOS 250D is the right choice. According to Canon, it is the lightest DSLR in the world with a rotating and swiveling touchscreen. I can definitely recommend it as a good camera for beginners. It is available at Amazon.
Complete beginner packages – sets
These three sets of mine offer everything you need to get started with digital photography:
Canon EOS 800D, 2 x 16 GB memory card, matching extra battery, bag.
Nikon D5600, 2 x 16 GB memory card, matching additional battery, bag
Canon EOS 250D, 2 x 16 GB memory card, matching additional battery, bag
Useful and good extensions for a small price
If you have some budget left when buying your DSLR camera, you can buy good accessories for a small amount of money, which will help you in the respective direction of photography.
Ideally, you already have an idea of what you want to photograph. When you are ready, you can think about an additional lens or accessories.
Portraits
If you plan to shoot people, go straight for a 50mm 1.8 lens. This will give you excellent image quality, and you can blur the background for „only“ around 120 Euros. Other lenses in this class often cost considerably more. Canon 50mm 1.8 STM, Nikon 50mm AF-S 1.8D.
Landscape & Architecture
For landscape photography, I would probably stick with the 18-55mm kit lens for now. Instead of another lens, I would invest in a good tripod (recommendation: Manfrotto Befree Advanced Alu, about 140 euros), a remote shutter release and some filters.
For stronger colors and reduction of reflections I recommend a polarizing filter (recommendation: Hoya Pro1, approx. 40 Euro).
In addition you can create nice long exposures with ND filters (recommendation: Hoya ND8 and Hoya ND1000, together about 75 Euro).
At a later stage, you will probably be interested in a wide-angle lens for landscape photography. If you have a Canon camera with crop sensor (APS-C), I recommend the Canon EF-S 10-22mm.
Sports
If you plan to shoot outdoors at sporting events, then I recommend getting a telephoto lens to go with it. Canon offers a 55-250mm STM IS, with image stabilizer. For 250 Euros you get a good image quality and can zoom in close to your subject.
If you read carefully at the lenses above, you will have noticed that the zoom range on this Canon lens is greater than a factor of 3. However, I find the image quality absolutely fine.
For indoor sporting events, it gets a little more difficult because you often don’t have enough light here. Similar to the portraits, I would recommend a 50mm 1.8 lens. This can handle low light, but you’ll have to be a little closer to your subject than with the telephoto lens above. Canon 50mm 1.8 STM, Nikon 50mm AF-S 1.8D.
Animals
For wildlife photography, you can usually only observe the animals from a distance, whether in the zoo or in the wild. So to shoot them you have to zoom in a lot. That’s why I again recommend Canon’s EF-S 55-250mm STM IS here, provided you’ve chosen a Canon camera. As described above, this telephoto lens has a good price-performance ratio at about 250 euros. In the meantime, I have published another separate article with my recommendations for this type of lens: Canon Telephoto Lens.
Plants and insects
You usually have to get close to these small subjects. Together with the kit lens, a close-up lens (recommendation: B+W +4 58mm, approx. 38 Euro) can be worthwhile here. Each lens has a close-up limit, up to which you can approach a subject with it. With a Canon EF-S 18-55mm IS STM, for example, it is 25 centimeters. Below this limit, it can no longer focus. You screw a close-up lens onto your lens like a filter. This reduces the closest focusing distance.
If you are interested in this kind of photography for a longer period of time, a macro lens will probably come into question for you at some point.
Conclusion
I hope that my article will help you to find the ideal DSLR camera for you and to get you started in the great hobby of photography. I put a lot of work into this article because I want to help you.
If you have any suggestions for the article or if I can help you in any other way, please write me in the comments!