Your printed images don’t look the way you edited them on the screen? Then you should know how to calibrate your monitor.
With a monitor, every viewer sees your images differently
In digital photography, there is one basic problem: everyone uses their own monitor. Unfortunately, if you edit your images on your monitor and then show them on the Internet, you never know how the viewer will really see the images. While monitors are getting better and better, each monitor still has its own representation of colors, contrast, and brightness.
For me personally, the end product of good photography is a good print.
Even if you don’t do exhibitions, I still recommend printing your images every now and then. It doesn’t have to be in a large size like 90 x 60 cm. Just print your 5 best pictures of the last half year in 30 x 20 cm. That doesn’t cost the earth either.
When you can hold your pictures in your hands, look at them yourself and show them to your friends, it’s a completely different feeling.
A good monitor is the basis for calibration
The calibration of the monitor adjusts the colors, brightness and contrast of the screen so that it reproduces your images as neutrally as possible. Now, every monitor has a certain palette that it can display. Depending on how good and large this palette is, the calibration can of course only be within these limits. Therefore, it makes sense to get a monitor for image processing. Such a monitor has a sufficiently large palette. Moreover, it is not as viewing angle dependent as cheaper representatives.
If you slide up and down a bit on your chair, the brightness of your pictures changes? Then a new monitor might be a good idea. A decent monitor doesn’t have to be particularly expensive either, as I show in my post Monitor for Image Editing.
This picture shows how much the color and brightness display depends on the viewing angle. On the left a monitor with TN panel, on the right IPS panel.
If you prefer to use a laptop, my article Laptop for image editing will help you.
Calibrating a monitor – how does it work exactly?
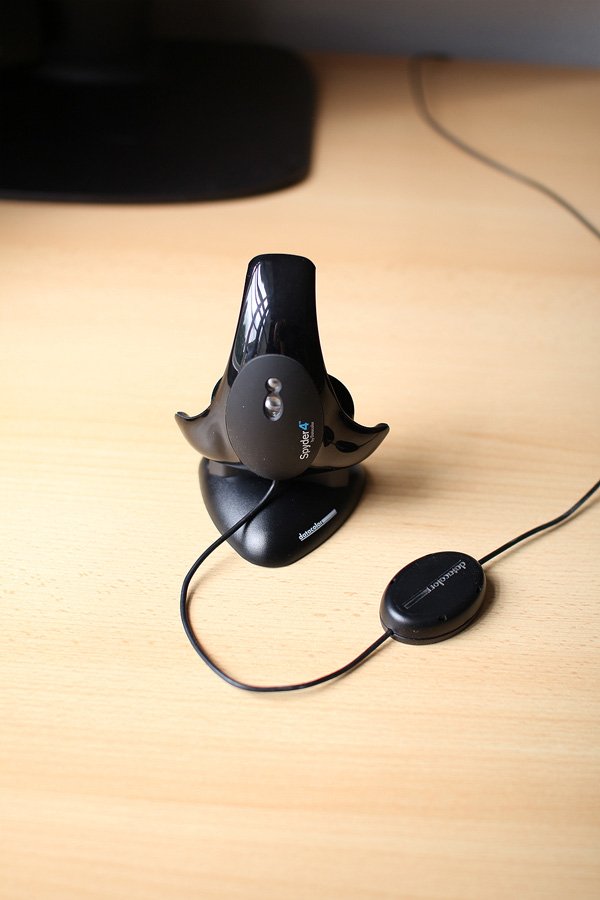
To calibrate your monitor, you need a calibration device, also called a colorimeter. Currently, Datacolor SpyderX Pro or X-Rite i1Display Pro are recommended. I use the predecessor, a Datacolor Spyder 4 Pro.
How does a screen calibration work? Simply said, you place the device in front of the monitor. Then it displays different colors and gray tones on the monitor with the included software, which it measures during this time. From this, the device creates a monitor profile that is exactly adapted to your monitor. The profile is used for your color display from this point on. The software guides you through the entire calibration process.
This process takes about 20 minutes and must be repeated every 3 months. Why is this important? Your monitor changes over time. The color intensity decreases, the brightness decreases and so the monitor needs to be recalibrated regularly.
After calibration, the colors may seem wrong at first. For example, if your monitor had a bluish cast, your eyes have already gotten used to it. After the calibration, the colors are neutral, but seem much too warm. After 1-2 days, however, you will have gotten used to it again.
To achieve the best possible results, the monitor should have been switched on for an hour directly before the calibration. In addition, the calibration should take place in similar light in which you usually edit your images.
After the calibration, the Spyder 4 Pro is placed right next to the monitor and measures the ambient light every 30 seconds. Depending on this, the profile of the monitor is then continuously adjusted if you have created several profiles for different light situations.
Now you have a good chance that your print will look like your image on the monitor.
Use a good print service provider
I use a print service provider for my prints. Why don’t I use my own printer? Good photo prints are currently mostly created with high-quality inkjet printers. Such a printer costs from 1500 Euro upwards. The problem with inkjet printers is that you have to print regularly, otherwise the print heads dry out. But I print only very irregularly, so such a printer is not worth it for me.
I therefore recommend finding a good printing service provider. I have already tested several for this and am very satisfied with Whitewall.
Tip: Use ICC profiles
Every printer has a different print image, also at the print service provider. To simulate this on your own monitor, you can download ICC profiles from good print service providers. You can load these into Lightroom or Photoshop to see how the print result will look. Of course, there are also other image editing programs that support this functionality.
The profiles differ both for the printers and for the different types of paper you can print on. For example, you can download the ICC profiles of Whitewall here and the ICC profiles of Saal Digital here.
Summary of the steps to calibrate your monitor
- Use a good monitor (does not have to be expensive)
- Calibrate monitor with appropriate device like SpyderX Pro
- Use good print service provider like WhiteWall
- Use ICC profiles of the service provider
- Enjoy your own prints
Other topics from the field of image processing
What are your experiences with monitor calibration? What has worked for you, what hasn’t? Are you happy with your prints? Write me in the comments!