Digital single lens reflex (DSLR) and mirrorless system cameras (DSLM) collect dust on the sensor after a few months. I show you how you can clean your sensor yourself. My method costs only about 8 Euros and takes about 30 minutes.
Contents
How does the dust build up?
Reason #1: Dust when changing lenses
There are several reasons for sensor contamination. After all, a camera is not a closed system. Every time you change your lenses, dust gets into the camera. If you have to change your lenses in dusty environments, then of course more dust gets into the body. I always try to keep the time between unscrewing and unscrewing the lens as short as possible to remedy this somewhat.
Reason #2: Abrasion by the mechanics inside the camera
A reflex camera, as the name suggests, has a mirror system that moves during shooting.
Digression: What actually happens inside the camera when the shutter is released?
Before the picture is taken, the light falls on a semi-transparent mirror that is located at an angle of 45 degrees in front of the sensor. Some of the light passes through it to the viewfinder so that the photographer can see the image. Another part of the light is deflected by this mirror so that it reaches the autofocus system. This system is located in the bottom of the camera.
Then, when the shot is taken, the mirror flips up to clear a path to the sensor. Now, depending on the exposure time, the shutter opens and the image is formed.
Here, a movement of components within the camera takes place. These components are designed to run as frictionless as possible. However, in any system where such movement takes place, the components also wear out. The wear is tiny, but it remains as dust in the camera. Some of it also ends up on the sensor.
Abrasion also takes place in a system camera. Just like in an SLR camera, the shutter works in front of the sensor. The shutter is responsible for the exposure times. Here, too, mechanical parts work that wear out over time, causing contamination on the sensor.
If your camera is new, then within the first 4 months you will have the most abrasion in this system. Of course, this value is only a kind of guide, because it depends a lot on how often you shoot.
But surely my camera has an internal cleaning function?
By now, all SLR and system cameras have their own cleaning function to deal with these problems. The dust in front of the sensor is loosened by ultrasound and then falls onto a dust collection unit, where it is held.
Of course, this function makes cleaning the sensor less often necessary. However, depending on the stubbornness of the dirt, the sensor still needs to be cleaned every few months. The internal cleaning function simply can’t handle everything.
According to this review from Digitalkamera.de, the internal sensor cleaning works best with Olympus, by the way.
When do you see sensor dust in particular?
Since the dust is in front of the sensor, the issue of depth of field also plays a role here. The depth of field increases the further the aperture is closed. So you see sensor dust especially when you close the aperture further. In my experience, this is true from aperture 8.
Sensor dust is especially visible in flat image areas. In front of a blue sky or a white wall without contours, you perceive the dust more strongly than on a flower meadow, since there are many details to be seen on the meadow anyway.
Sensor dust is particularly noticeable in long exposures of several minutes. The long exposure time creates monochrome areas. Irregularities are immediately noticeable to the human eye there.
What does a sensor cleaning of the camera at the manufacturer cost?
A cleaning of the sensor at the manufacturer is usually specified with about 90 euros. Independent precision mechanics and certain photo stores charge about 40 euros for this.
Professional cameras often include cleaning within the warranty period. The disadvantage is that the camera is out for 2-3 weeks and cannot be used during this time.
Is there a difference in sensor cleaning between Canon Nikon and Sony?
No. Since the mechanism works the same way for all manufacturers, there is no difference here.
If I clean my sensor myself, can I break anything?
You should proceed carefully when cleaning the sensor. Here you are moving in the world of fine mechanics, corresponding caution is required. My instructions are therefore at your own risk and without guarantee.
Photographers are often afraid of scratching their sensor during cleaning. With most cameras, however, this is not possible at all, because there is a high-pass filter in front of the sensor. This filter is a kind of glass and has several optical tasks. What I mean by this is that the dirt is always on this high-pass filter. Therefore, cleaning is exactly about cleaning this filter. If you scratch something there, it’s more likely to be this filter than the sensor.
How to clean my sensor
The following instructions are the way I clean my sensor. I have done this procedure not only on my own camera, but on many of the cameras of photographers in my circle of friends. This includes professional cameras like the Canon 1D. So far, it has worked without any problems.
If you clean your sensor this way, it’s still at your own risk.
1. these utensils you need
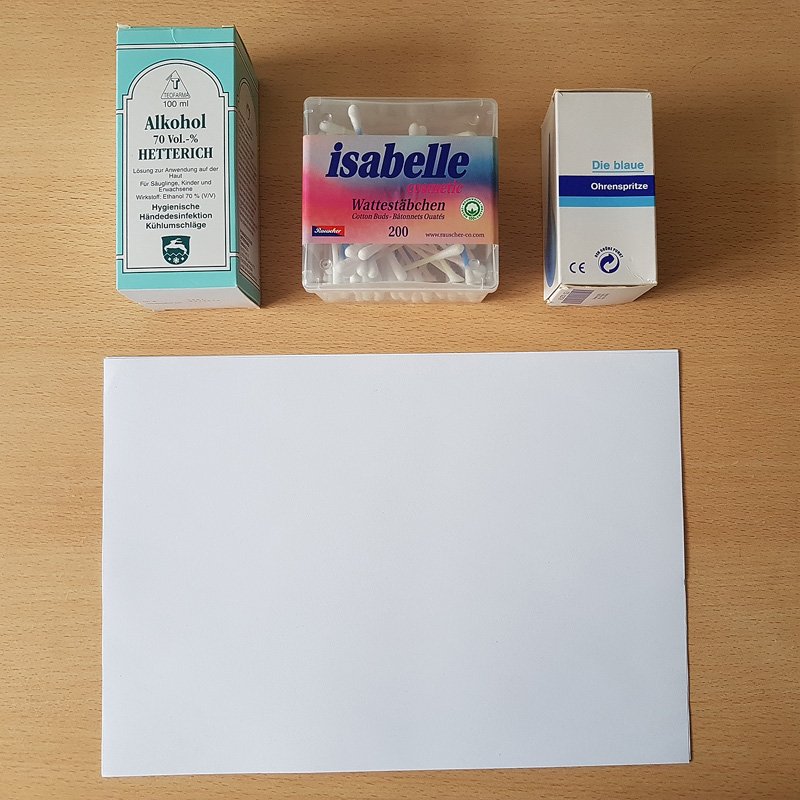
For sensor cleaning I use the following utensils.
- High proof alcohol (at least 70%, more like 90+%)
- Bellows (I use „The blue ear syringe“)
- Lint-free cotton swabs
- White paper (regular copy or printer paper in A4)
Except for the paper, these things are available at any pharmacy and together cost about 8 euros.
If you want to buy the alcohol, you will probably be asked by the pharmacist what you want to do with it. Usually it is not a problem. Make sure that you buy alcohol with as high a percentage as possible. Later, the sensor will be cleaned with it and then the alcohol will evaporate. The higher the percentage, the lower the risk that you will have residues of the other components on the sensor.
2. How to determine how dirty your sensor is
Before you start cleaning, you should determine how dirty your sensor is. This will determine whether cleaning is necessary at all.
If you are doing this for the first time, you will probably have a hard time judging if the sensor is already dirty. You will only know after the second or third time.
To check this, you need the white paper. I usually put 2-3 sheets on top of each other so that the background doesn’t show through. Now I put the paper on a table in front of me.
Now I set the AV mode on the camera, use my 18-55mm kit lens and set it to 18mm. On a full frame camera you can alternatively take a lens with 24 or 28mm. I set it to the smallest aperture, which is 22.
Now I focus manually and set the lens so that the focus points to infinity. To do that, I just look through the viewfinder, get close to something, and then turn the focus in exactly the other direction to the last possible position. That way you’re not focused on something close, but on something very far away.
Now I set JPG on the camera and get so close to the paper directly from above that it fills the whole viewfinder. I stand bent directly over the paper so that the camera is in the middle of it. Now I take the picture.
I load this image onto the computer and open it with Photoshop. You can of course use another image editing program of your choice. Now I apply an auto tone value correction to the image. How do I do that exactly? In Photoshop, go to the tonal value correction and click on Automatic. Alternatively, in Lightroom, you can tighten the Black and White sliders on the image just enough so that no tonal values are cut away. Now you can see how much dust is on your sensor.
The steps again as a summary:
- Set lens to 18mm
- Use AV mode with f/22
- Set focus to infinity
- Set JPG as image format
- Take a full size picture of the paper from above
- In Photoshop, apply autotone correction to the image
The first time you do this process it may take a while, but with time it comes off fairly quickly.
3. set manual cleaning in the camera
To clean your sensor, you need to select the manual cleaning menu item in the camera. This can be found in a different place on every camera. Just have a look in the menu or in the manual, where this item is located in your camera. Of course you have to take off the lens. Turn on manual cleaning only if you want to clean the sensor directly afterwards.
This activation is especially important for cameras with an internal image stabilizer (IBIS). In this case, the image sensor is mounted movably. If the cleaning mode is not activated, you run the risk of damaging the mechanism of the image stabilizer.
I recently cleaned the sensor of my Sony Alpha 7 III. On the net you can find different info if the cleaning mode has to be activated here or not. I have now tried it myself. If the camera is simply switched off, the sensor is still movable, so not locked. Here I have to activate the cleaning function in the camera. After this ultrasonic cleaning has run, the window with the info for further manual cleaning and a look into the manual must remain activated. The camera must therefore remain switched on. Only then the mechanism for the image stabilizer is locked and the sensor is fixed.
Stage 1: Dry cleaning with the bellows
First I try to remove the dust with air. I blow the bellows several times from different directions into the camera. The trick is to move the bellows as far as possible towards the sensor without touching the high-pass filter. I hold the camera above my head so that any dust that is loosened can fall out downwards. I’m sure this looks amusing to onlookers.
After cleaning, I have to turn my camera off again so that the mirror flips down.
After this procedure I check again with the above method if and how the state of contamination has improved.
Stage 2: Wet cleaning with cotton swabs and alcohol
Normally, dry cleaning loosens some dust particles, however, in my experience, you get better results with wet cleaning.
For this I use 2 cotton swabs per cleaning process. I drop a drop of the alcohol on the end of a cotton swab. Now I go with it over the high pass filter. I usually pull the filter off in strips and then wipe the outer edges again. With the other end and the second cotton swab I wipe the filter dry.
Here you have to find your own wiping technique that works best. It can also happen that you wipe the dust grains into a corner.
After the wet cleaning, I check the result on the computer again.
If there is still dust to be seen, then I do another wet cleaning.
So it can also happen that I have to wet clean four times before I am satisfied with the result. Most of the time it’s one dry cleaning and two wet cleaning.
How often should you clean your sensor?
As written above, this is highly dependent on your own photo habits. I always clean my sensor when I really notice the dust grains in my photos. Usually this is the case once a year.
Products for sensor cleaning
If you prefer to use ready-made cleaning kits instead, the Eyelead Sensor Adhesion Swab, VSGO Kit or UES Kit are often recommended in the scene.
What are your experiences with sensor cleaning? What has worked for you and what hasn’t?
> More articles from the photo technology section