About a year after I started photography, I stumbled across a couple of pictures on the web that looked so different. The leaves of the trees in these pictures were white, the sky a deep dark blue. It was infrared photography. I really had to try that out.
10 years later, various techniques and many pictures further, today there is the ultimate infrared photography guide.
In the first part of the tutorial you will learn how to take infrared photos with your digital SLR or system camera. In the second part, I show you how to take IR photos with an unconverted Sony F828 without a tripod. In the third part, I’ll show how post-processing works for infrared images.
Contents
What is infrared photography?
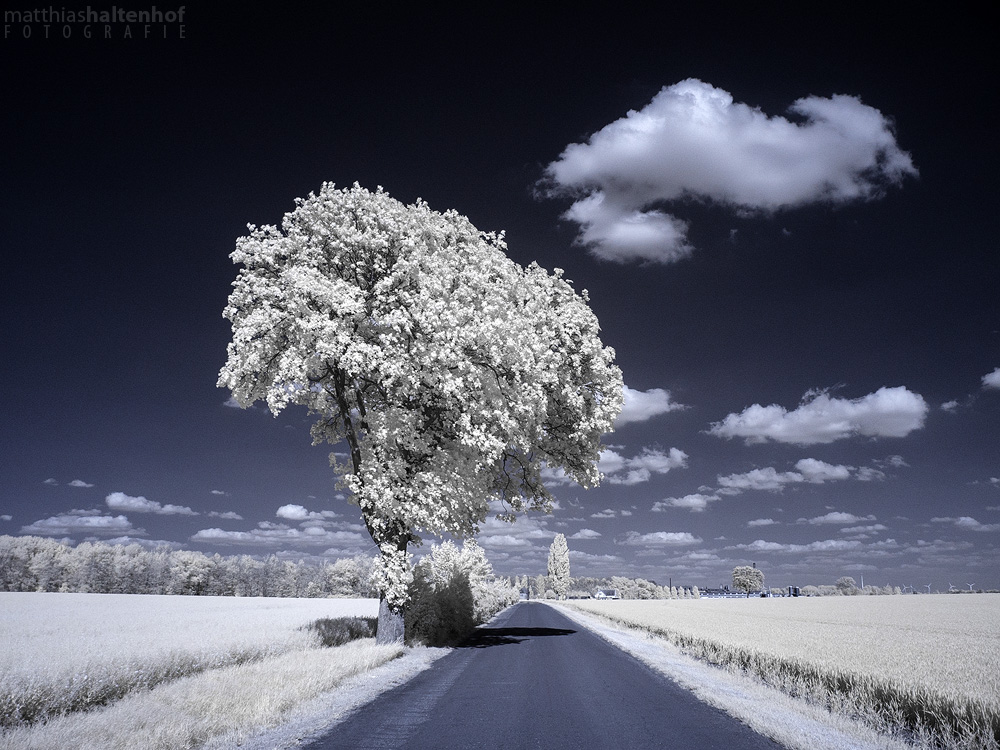
Infrared photography refers to photographing subjects in the infrared light spectrum. The human eye perceives light between a wavelength of 380 and 780 nanometers. The light that lies between 700 and 900 nanometers is called infrared. With the help of an infrared filter, which blocks the visible part of the light and allows only light in the infrared range to pass through, it is possible to use current digital cameras for infrared photography. For those who are not yet familiar with this type of photography, it looks at first glance like winter pictures with hoarfrost.
Infrared photography with an SLR or system camera (DSLR or DSLM)
Can I take infrared photos with a DSLR or DSLM? – The blocking filter
Digital cameras have an infrared blocking filter built in. This is the case with both SLR cameras and system cameras. This is to prevent infrared light from reaching the sensor. Without this filter, the colors of your images would be distorted. However, these blocking filters do not block the entire part of the infrared light.
To take infrared photos you need a filter that blocks the visible part of the light and only lets light through at infrared wavelengths. Such a filter can be screwed in front of the lens like other filters. However, the exposure times now become very long due to the infrared blocking filter inside the camera. With bright sunshine, aperture 5.6 and ISO 100, we are talking here about at least 30 seconds exposure time, tending more towards 3 minutes. So a tripod is indispensable.
Below I present an inexpensive camera with which you can take infrared photos without a tripod.
What does the same subject look like as a color photo and as an infrared photo?
In the following 4 pictures you can see how infrared photography looks like compared to normal light. I’ll also show you the final processed result.
Why not every lens works – the hotspot
Unfortunately not every lens can be used for infrared photography. Some lenses have what is called a hotspot. This is a bright spot in the center of the image that is caused by the lens design. Unfortunately, this bright spot cannot be removed with image processing. On the net there are different lists, which lenses are suitable and which are not. A list that is continuously updated can be found at DecaTec.
Which filters do I need?
The standard filter for infrared photography is the Hoya R72. For people who are into black and white photography, the Wratten 89B is a good choice. There are also other manufacturers of IR filters with different wavelengths, including Cokin and ZoMei.
Color infrared or black and white infrared photography
Of course, the choice of filter also determines how the final images will look. Depending on which wavelength you choose for the infrared filter, the image will look different. Therefore, a distinction is made between color IR and black and white IR.
Filters above 750 nanometers give almost only black and white after the right white balance. For me, the Hoya R72 on an SLR or system camera has proven to be a good compromise because it gives me a blue sky after processing. Alternatively, I can do a black and white conversion in Photoshop and get pleasantly contrasty images.
Each sensor reacts slightly differently to the wavelength chosen. While my previous Canon EOS cameras responded to the Hoya R72 as described in the last paragraph, with the Sony F828 bridge camera, for example, I get only black and white as a result at these 720 nm.
By the way, Michael Laukeninks wrote a nice guide on Kwerfeldein in 2011.
Procedure for taking pictures
Since you can’t see anything through the viewfinder or on the display with the infrared filter screwed on, you have to do your image composition beforehand. Also the focus has to be set beforehand. Usually the focus point is not the same as in visible light. Some lenses have markings for this focus point for infrared photography. For the beginning you can use the autofocus of the camera in the wide angle range, before you switch to manual focus and screw on the infrared filter.
Test the focus point of the lens
Focus point tip: I’ve had good experience testing the lens I shoot IR with the most in terms of focus point. To do this, I went out with my 10-22mm in direct sunlight, screwed the infrared filter in front of it, and manually adjusted the focus. Then I did a focus bracket to see where the correct focus point was. Of course, you need a lens with a distance scale to do that.
So I took several pictures at different focus: 0.5 meter, 1 meter, halfway between 1 meter and infinity, just before infinity, at infinity, and just past infinity. I looked at these images directly on the camera screen at maximum zoom. In doing so, I jumped back and forth between the images to see which was the sharpest. In most cases, the focus is right at the infinity position for me. But since every lens is built differently and behaves differently at different temperatures, I recommend you test it yourself.
Now you have to approach the right exposure time. A good starting point has proven to be a shot with ISO 800, aperture 5.6 and an exposure of 15 seconds. Using the histogram, you can now judge if you have the right exposure or if you need to adjust the time. Once you have found the right exposure, you can now calculate down by ISO steps how long you need to expose at ISO 100. This way you avoid test exposures that last for minutes. I have called this procedure the QuickTest method.
You can read more about the QuickTest method in my article about long exposures.
The best weather conditions
In my experience, infrared photography is only worthwhile in direct sunlight. When shooting with diffuse light (cloudy skies), I find the contrasts lacking and the images look dull. In addition, clear weather with little haze is advantageous – for example after a storm. If you are working with a non-modified camera with very long exposure times, it also helps to have as little wind as possible.
Clouds make the sky much more interesting in infrared photography. Fine veil clouds look especially fantastic in black and white infrared images. One of the nice things about infrared photography is that you very rarely have to worry about an overexposed sky or an underexposed landscape. So dynamic range problems are generally non-existent.
The right direction of light
Tip: When backlit, infrared images appear lacking in contrast. I often shoot IR with light in the back or with side light.
Which motifs are worthwhile?
In principle, everything can be photographed in infrared. For me, motifs in nature or in parks work especially well. Trees are certainly my most photographed motifs. A good tactic can be to juxtapose the living with the lifeless. A building in the middle of a park, which appears dark in infrared, can be combined well with the light tones of the leaves of a tree. By the way, the fact that the leaves are white in infrared photography is called the Wood effect.
At what time of year is IR worthwhile?
The „season“ for infrared photography is when the trees are bearing leaves. So that’s from about May to September. In winter, I leave the infrared filters and camera in the closet.
Providers of infrared conversions – have your own camera modified
Meanwhile, there are service providers who remove the infrared blocking filter of the camera or replace it with another one. This allows „normal“ exposure times that can be held without a tripod. The best known provider of infrared conversions is Lifepixel from the USA. In Germany Optic Makario offers the conversion. In the infrared forum IRreCams.de was recommended recently.
With the help of YouTube tutorials you can also convert a camera yourself. However, appropriate tools and some understanding of the electronic components are necessary.
Infrared photography without building a camera: My way to the Sony F828
As already written, I have been photographing infrared for more than 10 years. At that time I bought a cheap Sigma 18-50 F3.5-5.6 especially for my Canon EOS 300D, so that I had a lens without hotspot. When deciding on a wide angle lens for my Canon camera at the time, I went with the only one that was infrared capable (Canon EF-S 10-22mm).
My goal was to be able to do infrared photography without a tripod. For some time I had been toying with the idea of getting a modified camera. I had the option of having my old 450D converted to infrared by one of the vendors above.
The problem with this, however, was that the 450D already had about 50,000 trips behind it. The shutter is designed for 30,000. So it was only a matter of time until the shutter would give up. The second option was to have my 700D modified and buy a new one. But that would have been more expensive.
While browsing the Infrared Combine, I came across photographers who use the Sony F828. I had already tested once the Sony F717 of friends for infrared photos. At that time, I had been bothered by the fact that the battery life of the F717 was only about 30 minutes and the device only had 5 megapixels.
So in sum, I had 3 options:
- Have the 450D rebuilt and hope that the shutter will last a while – 400 Euros
- Buy a new 700D and have the old one modified – 950 Euro
- Buy a used Sony F828 and see how it works, if necessary have a DSLR modified – 250 Euro
To say it right away: I decided on the Sony F828 and am still super happy with this decision.
I bought a used Sony for 120 Euros on eBay. It was important to me that the lens and screen had no scratches. In addition, I looked that a lens hood is included, because infrared is very susceptible to flares. I also ordered a Hoya R72 and new batteries. This also solved the problem of battery life, because the F717 batteries were already 10 years old at the time and didn’t last very long. With new Patona batteries, the camera lasts 2.5 hours again. All together it was about 250 Euro.
Before you order now – read on, because in the meantime I use another infrared filter. At the very end of the article there is a list of what you need to get started with infrared photography.
But the Sony F828 is not modified either, is it?
The Sony F828 also has an infrared cut filter built in from the factory. The exposure times are about 5 seconds. However, Sony added a so-called Nightshot mode at that time. This mode is – as the name suggests – intended for night photography. In this mode, the blocking filter folds away. Problem with this is that you could probably shoot through thin clothing with this Nightshot mode and certain exposure times. So Sony has fixed the settings in Nightshot mode to F2.0 and 1/30 second to stop that. Of course, that’s a big limitation, even in terms of image quality.
So in the past, infrared photographers would then use an infrared filter a la the Hoya R72, plus one or more ND8 filters to be able to shoot infrared handheld in Nightshot mode. Without ND8, the images would be severely overexposed.
What revolutionized IR photography in 2014 with the F828 – The Magnet Hack
Daniel Schweinert disassembled the F828 in 2014 and found out that the flip away of the blocking filter in Nightshot mode is controlled by a small electromagnet. With the help of a neodymium magnet, the blocking filter can be folded away from the outside without having to disassemble the camera.
This allows normal exposure times in daylight. An additional ND filter is no longer necessary. Finally shooting infrared handheld without camera disassembly!
I searched for a while until I found the right magnets. I then bought these neodymium magnets via Amazon and use two of them in a row (there were 50 in the package). It works wonderfully with them.
In the meantime, I find the Sony F828 to be the best solution for infrared photography. The camera has an electronic viewfinder through which I can see the IR image while I’m shooting. If you use a current system camera – the F828 viewfinder is relatively small and not exactly high-resolution. But it is good for image composition.
The Sony F828 is from 2003, but it can already do RAW. However, saving a RAW file takes about 10 seconds. In the beginning I found this annoying, but in the meantime it is just pleasantly decelerating. Do the 8 megapixels bother me? No. The camera takes sharp pictures that are in no way inferior to an 8 MP DSLR. And even for prints, 8 megapixels are perfectly sufficient for me.
I use the camera in A mode (aperture priority) with an aperture of 5.0 and ISO 64. I usually overexpose by +0.7 stops because my IR subjects are bright and the camera tends to underexpose otherwise. This gives me exposure times of about 1/250 second in sunlight.
Memory cards for the Sony F828
The Sony F828 uses Compact Flash memory cards. I am currently using a Sandisk Ultra 8 GB card with 50 MB/second speed. This one has a silver label. I suspect that 16 GB cards can also be used with the F828, but have not tried it myself. One recommendation is this 8 GB CompactFlash card from Transcend.
Tips for focusing with the Sony F828 in infrared light
When I first started shooting with this camera, not all of the images were sharp. I had a smaller, center AF point selected and always used it to focus on high contrast areas and then flipped. As I said, not all of the images were sharp, which is why I wasn’t thrilled with the image quality to begin with.
After many different reviews with the autofocus methods, I ended up with manual focus. The variant that works best for me is to set it to manual focus and then focus on infinity in the viewfinder. The infinity mark is then visible in the lower left corner. This gives me consistently sharp results.
Differences of infrared filters on the F828
Initially I ordered the Hoya R72 as IR filter for the F828. At this point I was already familiar with post processing. After a few photo trips with the new camera, I noticed that the results after processing were all approximately black and white. Yet the R72 in combination with my 450D and 700D had always delivered beautifully blue skies.
The sensor of the Sony F828 obviously perceives infrared light differently. With an R72, as mentioned above, the images become almost completely black and white. After some research on the net, I ordered a Heliopan RG 645 from macodirekt. As the name says, the RG 645 filters in appropriate light spectrum. With this filter the F828 delivers rather color infrared images.
I currently use this IR filter on the Sony F828
But I wanted to have again similar results as with the R72 on the Canon EOS, where the sky is still slightly blue and I can then decide whether to leave it like that or convert the image to black and white. Now I’ve ended up with the B+W F-Pro 092, which has just that right wavelength of 695nm.
Post-processing of infrared photography
As you can already see from the sample images, appropriate post-processing is necessary. With the following 5 steps I will show you how to get there. For the postprocessing you need Adobe Photoshop, which is included in the Adobe photo subscription.
1. the right white balance – create your own camera profile
I shoot in RAW. Since infrared is outside of visible light, you can’t set a suitable color temperature in most RAW converters. To neutralize the red color cast, you would have to set about 1800 Kelvin. Thus, the lowest setting option for white balance in Adobe Camera RAW is 2000 Kelvin. How can you get around this limitation? You have to work with Adobe’s DNG Profile Editor and use it to create your own camera profile.
Download the Adobe DNG Profile Editor
Since the end of 2020 the download of the DNG Profile Editor on the Adobe site does not work anymore. Even after asking several times, there was unfortunately no change. I searched the internet for several hours and found the correct files. You can download them here:
Download DNG Profile Editor Windows + Mac + Documentation (Zip file, 84.7 MB)
This download contains the latest versions (1.0.0.46) of the DNG Profile Editor for Windows (7, 8, 10, 64 Bit) and Mac (Mac OS X/Intel) in German. Also included is the English documentation for the program as a PDF file.
The DNG Profile Editor is free of charge and intellectual property of Adobe Systems GmbH. More about the DNG format can be found directly at Adobe.
After the download you can open and install the respective file. Now you can create your own camera profile as follows.
First you open the image in ACR and save it as DNG. Open this DNG in the Adobe Profile Editor. Now set the color temperature to -90 under Color Matrices.
Then save the recipe and export the camera profile. The DNG Profile Editor directly selects the appropriate folder for the Adobe Camera RAW Profile. ( C:\Users\yourusername\AppData\Roaming\Adobe\CameraRaw\CameraProfiles )
This process only needs to be done once to create the infrared camera profile. You can then use it for all your infrared images. Now you can close the DNG Profile Editor, the next steps will be done in Adobe Photoshop and Adobe RAW Converter.
Download the infrared camera profile for the Sony F828
Update 04/09/2018: Some readers seem to have problems with the creation of the camera profile. Therefore, here is the camera profile of my Sony F828 for download. For my Adobe Photoshop CC 2019, it is saved under this file path:
C:\Users\yourusername\AppData\Roaming\Adobe\CameraRaw\CameraProfiles.
When you navigate to this file path in Windows, you may need to click Users as the first folder instead of Users.
Update 5/11/2021: I just looked again because of a query in the comments – the file path for the camera profile is still the same, even with Adobe Photoshop CC 2021. That’s because Adobe Camera RAW (ACR) works relatively detached from Photoshop, and in that respect it makes no difference whether you open Photoshop CC 2018, 2019, 2020, or 2021. It always loads the same version of ACR, which for me is currently 13.2. So the profile for the F828 still works.
If you now open an image in Adobe Camera RAW, the profile is not yet found there.
Under the basic settings you can select Camera Profile at the top. There you click on „Browse…“.
In the next window you can click on „Profiles“. If you have saved your profile under C:\Users\yourusername\AppData\Roaming\Adobe\CameraRaw\CameraProfiles, it will appear directly here.
You can add it to your favorites by clicking on the star in the upper right corner. This has the advantage that you can see it directly in the overview of your camera profiles and you don’t have to click on „Browse…“ every time.
After clicking on the star, you can click on the „Close“ button in the upper right corner and find the profile now as a selection option in the profile under the basic settings.
The result is that the white balance is shifted. Now take the eyedropper for the white balance in the main window and ideally click on a sunlit meadow. Alternatively, you can click on the leaves of a tree. This completes the white balance.
You can make the subsequent adjustments as usual. Sometimes I also use the automatic settings and look at the result. Often Adobe Camera RAW develops the IR image too bright, but that can then be adjusted via the exposure slider.
After you have made your adjustments, you can now click on „Open“ to have the developed RAW opened in Adobe Photoshop.
2. channel swap red and blue
To get a blue sky, the first step is to swap the red and blue channels. This can be done using channel mixer. I prefer to work with adjustment layers, then I can undo changes afterwards. For the swap you select the red channel in the channel mixer, set red to 0 and blue to 100, in the blue channel you set blue to 0 and red to 100.
3. tone value correction
Infrared photos are usually a bit flat. That’s why you now bring more contrast into the image. With an auto tone correction you can set clear white and black points, which already increases the contrast noticeably. This can be done by simply clicking on the „Auto“ button in the tone value correction window.
4. remove residual colors
Even if infrared images already have much less colors than a normal image, there may still be residual colors in leaves or grass after the channel swap. With another adjustment layer „Hue/Saturation“ you can set the saturation of all color channels except blue to 0 to remove disturbing residual colors.
5. increase contrast with gradation curves
Finally, I usually adjust the contrast using a gradation curve in the form of an „S“. Depending on how pronounced this „S“ is, the stronger the contrast. Often, only a slight variation is enough, like in the screenshot.
A video tutorial on post-processing and creating your own infrared camera profile is available here:
Get started with infrared photography now!
Infrared photography offers a completely new approach to familiar subjects. So you move away from your own, perhaps somewhat ingrained ways.
Do infrared images appeal to you? Then you can try IR yourself with manageable means.
If you already have Adobe Photoshop, then all you need is:
- A used Sony F828 (approx. 100 €)
- 2x matching Patona batteries (ca. 25 €)
- Charger for the batteries (about 13 €)
- CompactFlash memory card (approx. 17 €)
- B+W F-Pro 092 infrared filter (approx. 100 €)
All in all, that’s about 250 € and you’re ready to go. Have fun trying it out!
Do you have questions about infrared photography? Are you stuck at a certain point? What are your IR experiences? Write me in the comments!