In today’s guide, I’ll teach you everything you need to know about long exposure photography. No matter if it’s day or night, no matter if you want to capture water or the light trails on the highway. Of course, I’ll also show you what filters I use for this.
Contents
What is a long exposure?
In photography, a long exposure is when a picture is exposed for several seconds. There is no exact limit as to when an exposure counts as a long exposure. Subjectively, I would say from one second upwards. There is no upper limit, of course. This kind of photography is mainly used in landscape photography.
Do I need a specific camera for long time exposures?
You can take long exposures with any camera that allows you to set the exposure time manually or semi-manually. This means that it works with practically all SLR cameras, system cameras and with the higher-quality compact cameras. If you have the possibility to set the exposure time directly in your camera, you can find out in your manual.
If your camera has an AV, TV and M mode, then you can use it to take a long exposure. Most cameras with these modes allow exposures up to 30 seconds. If you want to take a longer exposure than 30 seconds, you can use the Bulb mode. Most SLR and system cameras have this mode.
Which filters do I need for long time exposure?
If you want to make a long exposure during the day in normal light, then you need appropriate filters. If you take a long exposure in midday sun without a filter, the resulting image is just white because too much light hits the sensor. So you have to make sure that less light reaches the sensor.
For long exposures you need ND filters, also called gray filters. These block a large part of the incident light and ensure that you do not take an overexposed image even with exposure times of several minutes.
For exposures between 10 seconds and 2 minutes, I recommend two filters: the Hoya ND8 and the Hoya ND400. This will allow you to be quite flexible in achieving different exposure times in conjunction with the aperture.
If you want to make exposures between 2 and 10 minutes and are perhaps more into black and white photography, then I recommend the B+W 106 and B+W 110.
I myself have all 4 filters and can be very specific about what exposure time I want to achieve.
For exposures at night no filters are necessary, because there is less light.
If I photograph in the morning or evening in stream valleys, then there is usually diffuse light and it is also not particularly bright. Then, for example, a polarizing filter is also sufficient to achieve exposure times of, say, 3 seconds.
Do you want to get new tips about photography regularly? Then follow this link.
What other accessories are useful for long exposures?
Manfrotto BefreeBesides camera and filters I recommend a good tripod (I use the Manfrotto Befree) and a remote release. A tripod is absolutely necessary, because you can’t handhold exposure times of several seconds without blurring the image. In addition, to take exposures longer than 30 seconds and not shake the camera when you release the shutter, you’ll need a remote shutter release. I prefer cable remote releases so that the battery of the radio or infrared shutter release doesn’t run out at some point during shooting. Each camera needs its own particular remote release, just search Amazon for remote release + camera model.
How does a long exposure usually work? – From the setup to the settings
When I take long exposures, the technical process is often similar. I usually have a subject picked out that I want to photograph. I also have a reason why I think a long exposure is appropriate for it. More about this in the tips below.
Then I think about from which point of view I want to take the photo. In the process, of course, I think about the composition of the image.
I then set up my tripod there, plug in the remote shutter release and make the composition I want, but without screwing on the filters yet.
Now I let the camera focus. I almost always use liveview focus for this, because in my experience it’s more precise than normal autofocus. Then when the image is in focus, I select the manual focus(MF) setting on my lens. The reason for this is that the camera would not be able to find the focus with the filters screwed on, because the image would then already be too dark for the autofocus. The result would be a blurred image.
Tip #1: Deactivate image stabilizer
When taking exposures from a tripod, you should always turn off the image stabilizer, otherwise you may end up with blurry images.
So now after setting it to manual focus, I screw on my filters. I almost always use two filters. Of course, it depends on what exposure time you want to achieve.
Tip #2: Cover the viewfinder
A reflex camera works with a semi-transparent mirror. Through this mirror half of the light is distributed into the autofocus system and the other half into the viewfinder. So light can also enter the camera through the viewfinder. In „normal“ photography this is usually not the case, because the eye is usually in front of the viewfinder when the shutter is released. Especially for long exposures you should cover the viewfinder.
Most cameras have a small rubber cover attached to the camera strap. To attach it, you have to remove the rubber eye cap from the viewfinder and attach this viewfinder cover instead. Some cameras offer the possibility to close the viewfinder by a lever with its own mechanism.
Finding the optimal settings with the QuickTest method
Now I make a test exposure with the following settings in manual mode: ISO 1600, aperture 5.6, 15 seconds.
After this test exposure, I look at the histogram and assess whether the exposure is OK. How do I know? There should be no peak at the far right end. That would mean that I have parts of the image that are overexposed and therefore have no image information left. Still, the brightness distribution in the histogram should just about reach the right end so that I capture a well-exposed image. This technique is called expose to the right.
So often I have to make corrections at this point and adjust my exposure time or aperture until I have a good looking histogram. So that means just taking several test exposures and feeling my way towards the final result. I almost always leave the ISO at 1600.
As an estimation aid with Canon cameras: the background of the histogram is provided with bars. One bar means one f-stop. So if the curve in the histogram is still one bar away from the right edge, I double the exposure time to get the desired good exposure. Then the brightness distribution in my histogram just reaches the right edge.
This procedure sounds a bit complicated when you first read it, but once you’ve done it yourself a few times, it comes off very easy.
Most cameras also have an overexposure warning that can be activated in the menu and then shows the overexposed areas flashing directly in the image.
Let’s assume that with the settings of my test exposure (ISO 1600, aperture 5.6, 15 seconds) we get a well-exposed image and histogram in which no parts of the image are overexposed. For optimal image quality, I want to take the photo at ISO 100, of course. Now I have to calculate my final exposure time. The aperture remains the same and I only vary ISO and time. If I go down one step with the ISO, the exposure time doubles.
ISO – Exposure time
1600 – 15 seconds
800 – 30 seconds
400 – 1 minute
200 – 2 minutes
100 – 4 minutes
So my final exposure would be at ISO 100, f/5.6 and 4 minutes. Then I would have a perfect histogram. And with exactly these settings I then take the picture in manual mode.
Of course, I can also take the test exposures directly with ISO 100. The problem with this is that the entire process then takes a very long time, because when correcting the exposure time, I have to wait another 5 minutes for the final image. With the QuickTest method it is much faster.
I always shoot in RAW mode because I can set the white balance later on the PC. This also makes it easier to fix any color casts from the ND filters.
Checklist of the process of a long exposure
- Choose a point of view
- Set up equipment
- Determine image composition
- Focus in Liveview
- Switch to manual focus
- Deactivate image stabilizer
- Screw on ND filter
- Cover viewfinder
- Determine the correct exposure time with the QuickTest method
- Shoot final exposure
These motifs work particularly well with long exposures during the day
Movement of clouds
Bulb exposure can be used to simplify an image. In a 60 second exposure, you have the movement of the clouds in the image. This can be an interesting effect, but it should also fit the image. Alternatively, in an 8 minute exposure, you have almost no clouds on the image because so much has happened in the sky during that time. This makes the sky look very uniform, which just simplifies the image.
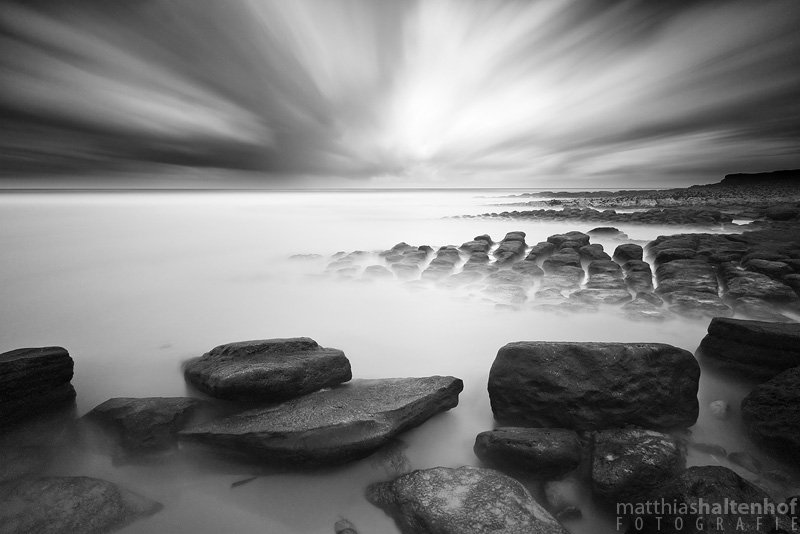
Softening details in water
You can also take advantage of this with water. Sea and rivers often show a lot of details that lead the attention away from elements in the image. A long exposure can be used here to simplify and create a surreal effect.
Make populated places deserted
In places that are teeming with tourists, you can use a long exposure to make the square in front of it deserted. This requires long exposure times of 10 minutes upwards.
These motifs work particularly well with long exposures at night
Capture tracers from cars
Surely you know this picture with the tracers of cars. While you make an exposure, the car moves through your picture and draws its tracks with the headlights.
Popular and effective here is to shoot from a highway bridge down onto the highway. But other streets, bus stations and squares can also produce interesting results.
Recommended settings: ISO 100, f/11, 30 seconds.
Starry sky – capture Milky Way or earth movement
A special kind of long exposure is photographing the starry sky. Here you are well advised to use a wide-angle lens. Now there are two possibilities:
Show the starry sky as you see it yourself and maybe make the Milky Way visible(only works away from big cities in the countryside). For this you can think of an exposure with the following settings: Aperture 4, ISO 3200, 30 seconds. During this time, the angle of the Earth’s rotation is so minimal that the stars still appear almost point-like in your image.
Capture the rotation of the Earth in the image during your exposure. Exposure times between 30 minutes and 3 hours are recommended. In my Startrails Tutorial I have described in detail how this works.
Light painting with flashlight and sparklers
Light painting is especially fun and playful. You set up the camera with a tripod in a dark place and focus on a distant point of light, such as a streetlight. Then set the focus back to manual and point the camera at the actual scene. Now start an exposure of, say, one minute. You can now use a flashlight to „paint“ in front of the camera. From letters to pictures to shapes, there are no limits to your imagination. While painting, you should move yourself permanently if you do not want to be seen in the picture. With sparklers, bar lights and several people can create great pictures here.
Recommended settings: ISO 100, f/11, 1 minute.
By the way, if you want to get into this area even more, I can recommend my colleague Jörg Schmidt. He also has special lightpainting workshops.
Bonus: 6 tips for better pictures with long time exposures
- For classic long exposures during the day, it has proven to be good to specifically combine moving objects with non-moving ones. This can be, for example, a tree, which stands for stillness and immobility and, on the other hand, a sky, in which the cloud movement is clearly visible with one minute exposure time.
- This composition also works well by the sea. A jetty or a pier in combination with the waves gets a surreal effect in a long exposure.
- At exposure times above 10 minutes, the noise of APS-C cameras increases significantly. Therefore, I try to stay below these limits.
- If the exposure time is not sufficient even with two filters, a polarizing filter can also be used for other purposes, since it also absorbs light.
- Water has a surreal effect from 5 seconds upwards. If you still want to capture the movement of the water without all the details being visible, choose an exposure time of 0.3 seconds. This works especially well with beach waves and mountain streams.
- A separate form of long exposure is fireworks photography. I wrote a separate article about this here: Photographing Fireworks.
If you have any questions about long exposures, just drop me a line in the comments. If the article has helped you, then of course I’m also happy about a few words and sharing on Facebook.
Have fun trying it out!
I hope this article was helpful for you. If you want, you can leave your email address. Then I will send you a short note every time I put a new blog post online.